Python OpenCV – 姿态估计
什么是姿态估计?
姿势估计是一种计算机视觉技术,用于从图像中预测身体的配置 (POSE)。其重要性的原因是可以从技术中受益的大量应用程序。
人体姿势估计定位身体关键点,以准确识别给定图像的个人姿势。这些估计在 3D 或 2D 中执行。
人体姿势估计的主要过程包括两个基本步骤:i)定位人体关节/关键点 ii)将这些关节分组为有效的人体姿势配置
第一步,主要着眼于寻找人类每个关键点的位置。例如头、肩、臂、手、膝、脚踝。第二步是将这些关节分组为有效的人体姿势配置,以确定身体部位之间的成对项。

图(b)代表检测关键点,图(a)代表关键点分组
什么是OpenCV ?
OpenCV Python是一个Python绑定库,旨在解决计算机视觉问题。它主要侧重于图像处理、视频捕获和分析,包括人脸检测和对象检测等功能。
在Python使用OpenCV :
OpenCV Python只不过是与Python一起使用的原始 C++ 库的包装类。使用它,所有 OpenCV 数组结构都可以转换为/从 NumPy 数组。这使它更容易与其他使用 NumPy 的库集成。例如,SciPy 和 Matplotlib 等库。
要了解有关 OpenCV 的更多信息,请访问 https://opencv.org/about/
您可以使用的数据集:
在数据集选择中,COCO 和 MPII 是最近案例中的默认选择。特别是,COCO 是一个著名的数据集,因为它具有非常广泛的人体姿势和大量图像。 LSP 和 FLIC 数据集也用于 COCO 和 MPII。
- http://cocodataset.org/#keypoints-2018
- http://human-pose.mpi-inf.mpg.de/
- http://www.robots.ox.ac.uk/~vgg/data/pose_evaluation/
您可以使用此位置提供的脚本下载模型权重文件。
OpenCV中人体姿态估计的代码
在本节中,我们将看到如何在 OpenCV 中加载训练好的模型并检查输出。我们将讨论仅用于单人姿势估计的代码,以保持简单。如果存在多人,这些输出可用于查找帧中每个人的姿势。我们将在以后的帖子中介绍多人案例。
首先,从下面下载代码和模型文件。图像和视频输入有单独的文件。如果您在运行代码时遇到任何困难,请仔细阅读README文件。
步骤 1:下载模型权重
使用随代码提供的getModels.sh文件将所有模型权重下载到相应的文件夹。请注意,配置 proto 文件已存在于文件夹中。
Python3
sudo chmod a+x getModels.sh
./getModels.sh
Python3
# Specify the paths for the 2 files
protoFile = "pose/mpi/pose_deploy_linevec_faster_4_stages.prototxt"
weightsFile = "pose/mpi/pose_iter_160000.caffemodel"
# Read the network into Memory
net = cv2.dnn.readNetFromCaffe(protoFile, weightsFile)
Python3
# Read image
frame = cv2.imread("single.jpg")

# Specify the input image dimensions
inWidth = 368
inHeight = 368

# Prepare the frame to be fed to the network
inpBlob = cv2.dnn.blobFromImage(
    frame, 1.0 / 255, (inWidth, inHeight), (0, 0, 0), swapRB=False, crop=False)

# Set the prepared object as the input blob of the network
net.setInput(inpBlob)
Python3
output = net.forward()Python3
H = out.shape[2]
W = out.shape[3]
# Empty list to store the detected keypoints
points = []
for i in range(len()):
    # confidence map of corresponding body's part.
    probMap = output[0, i, :, :]

    # Find global maxima of the probMap.
    minVal, prob, minLoc, point = cv2.minMaxLoc(probMap)

    # Scale the point to fit on the original image
    x = (frameWidth * point[0]) / W
    y = (frameHeight * point[1]) / H

    if prob > threshold:
        cv2.circle(frame, (int(x), int(y)), 15, (0, 255, 255),
                   thickness=-1, lineType=cv.FILLED)
        cv2.putText(frame, "{}".format(i), (int(x), int(
            y)), cv2.FONT_HERSHEY_SIMPLEX, 1.4, (0, 0, 255), 3, lineType=cv2.LINE_AA)

        # Add the point to the list if the probability is greater than the threshold
        points.append((int(x), int(y)))
    else:
        points.append(None)

cv2.imshow("Output-Keypoints", frame)
cv2.waitKey(0)
cv2.destroyAllWindows()
Python3
for pair in POSE_PAIRS:
    partA = pair[0]
    partB = pair[1]

    if points[partA] and points[partB]:
        cv2.line(frameCopy, points[partA], points[partB], (0, 255, 0), 3)
检查文件夹以确保已下载模型二进制文件( .caffemodel文件)。如果您无法运行上述脚本,那么您可以通过单击此处下载 MPII 模型和此处下载 COCO 模型来下载模型。
第 2 步:加载网络
我们正在使用在 Caffe 深度学习框架上训练的模型。 Caffe 模型有 2 个文件 –
- prototxt文件,它指定了神经网络的架构——不同层的排列方式等。
- caffemodel文件,用于存储训练模型的权重
我们将使用这两个文件将网络加载到内存中。
蟒蛇3
# Specify the paths for the 2 files
protoFile = "pose/mpi/pose_deploy_linevec_faster_4_stages.prototxt"
weightsFile = "pose/mpi/pose_iter_160000.caffemodel"
# Read the network into Memory
net = cv2.dnn.readNetFromCaffe(protoFile, weightsFile)
第 3 步:读取图像并准备网络输入
我们使用 OpenCV 读取的输入帧应转换为输入 blob(如 Caffe),以便将其馈送到网络。这是使用blobFromImage函数完成的,该函数将图像从 OpenCV 格式转换为 Caffe blob 格式。
这些参数将在 blobFromImage函数。首先,我们将像素值归一化为 (0,1)。然后我们指定图像的尺寸。接下来,要减去的平均值,即 (0,0,0)。由于 OpenCV 和 Caffe 都使用 RGB 格式,因此无需交换 R 和 B 通道。
蟒蛇3
# Read image
frame = cv2.imread("single.jpg")

# Specify the input image dimensions
inWidth = 368
inHeight = 368

# Prepare the frame to be fed to the network
inpBlob = cv2.dnn.blobFromImage(
    frame, 1.0 / 255, (inWidth, inHeight), (0, 0, 0), swapRB=False, crop=False)

# Set the prepared object as the input blob of the network
net.setInput(inpBlob)
第 4 步:进行预测并解析关键点
蟒蛇3
output = net.forward()
输出是一个 4D 矩阵:
- 第一个维度是图像 ID (),以防您将多个图像传递给网络)。
- 第二维表示关键点的索引。该模型生成置信度图和部件亲和度图,它们都是串联的。对于 COCO 模型,它由 57 个部分组成——18 个关键点置信度图 + 1 个背景 + 19*2 部分 Affinity Maps。同样,对于 MPII,它产生 44 个点。我们将只使用与关键点相对应的前几个点。
- 第三个维度是输出地图的高度。
- 第四个维度是输出图的宽度。
一旦检测到关键点,我们只需将它们绘制在图像上。
蟒蛇3
H = out.shape[2]
W = out.shape[3]
# Empty list to store the detected keypoints
points = []
for i in range(len()):
    # confidence map of corresponding body's part.
    probMap = output[0, i, :, :]

    # Find global maxima of the probMap.
    minVal, prob, minLoc, point = cv2.minMaxLoc(probMap)

    # Scale the point to fit on the original image
    x = (frameWidth * point[0]) / W
    y = (frameHeight * point[1]) / H

    if prob > threshold:
        cv2.circle(frame, (int(x), int(y)), 15, (0, 255, 255),
                   thickness=-1, lineType=cv.FILLED)
        cv2.putText(frame, "{}".format(i), (int(x), int(
            y)), cv2.FONT_HERSHEY_SIMPLEX, 1.4, (0, 0, 255), 3, lineType=cv2.LINE_AA)

        # Add the point to the list if the probability is greater than the threshold
        points.append((int(x), int(y)))
    else:
        points.append(None)

cv2.imshow("Output-Keypoints", frame)
cv2.waitKey(0)
cv2.destroyAllWindows()
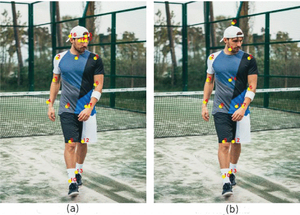
图(a)显示了使用 COCO 模型绘制的关键点。图(b)显示了使用 MPII 模型绘制的关键点。
第 5 步:绘制骨架

这张图展示了所有关键点连接起来形成的骨架
蟒蛇3
for pair in POSE_PAIRS:
    partA = pair[0]
    partB = pair[1]

    if points[partA] and points[partB]:
        cv2.line(frameCopy, points[partA], points[partB], (0, 255, 0), 3)
我们发现 COCO 模型比 MPI 模型慢 1.5 倍。
姿态估计的应用:
- 手语帮助残疾人。
- 人体追踪
- 赌博
- 视频监控
- 高级驾驶辅助系统 (ADAS)
- 动作识别
参考:
- https://github.com/CMU-Perceptual-Computing-Lab/openpose
- https://learnopencv.com/deep-learning-based-human-pose-estimation-using-opencv-cpp-python/
- https://ieeexplore.ieee.org/document/9144178