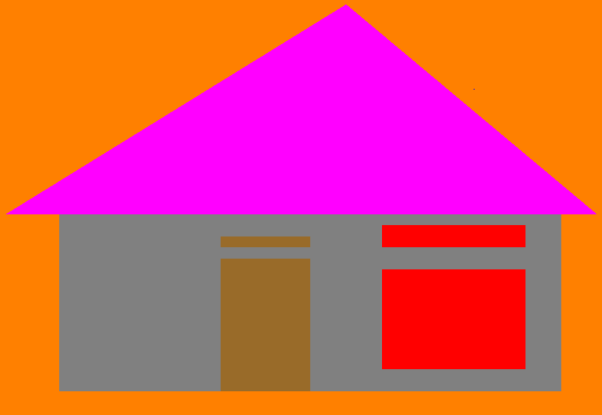
在本文中,我们将讨论如何使用两个基本形状(即三角形和矩形)在OpenGL中创建小屋的正面视图。
方法:请按照以下步骤解决问题:
- 使用函数glutInit(&argc,argv)初始化工具箱。
- 使用函数glutInitDisplayMode(GLUT_SINGLE | GLUT_RGB)设置显示模式并指定配色方案。
- 使用函数glutInitWindowSize(1200,740)指定窗口大小。
- 使用函数glutInitWindowPosition(0,0)设置窗口的起始位置。
- 使用函数glutCreateWindow(“ Basic hut like like structure”)初始化窗口并设置标题。
- 初始化myInit()函数并执行以下步骤:
- 使用函数glClearColor(1.0,0.5,0.0,1.0)将背景色设置为橙色。
- 使用函数gluOrtho2D( 0.0,400.0,0.0,400.0)指定显示区域。
- 初始化myDisplay()函数并执行以下步骤:
- 使用函数glClear(GL_COLOR_BUFFER_BIT)清除屏幕。
- 可以使用glPointSize(4.0)函数绘制小屋的矩形部分。
- 将绘图颜色设置为glColor3f(0.5f,0.5f,0.5f) 。
- 使用多边形命令创建两个窗户,门,顶部三角形和房屋的主要矩形,并使用以下功能设置其顶点:
- glBegin(GL_POLYGON);
- glVertex2i(x,y);
- 使用函数glColor3f(R,G,B)在上述步骤中为多边形着色。
下面是上述方法的实现:
C++
// C++ program for the above approach

#include
#include
#include
using namespace std;

// Function to initialize the drivers
void myInit(void)
{
    // Clear all the screen color
    glClearColor(1.0, 0.5, 0.0, 1.0);

    // Sets background color to orang
    glMatrixMode(GL_PROJECTION);

    glLoadIdentity();

    // Specify the display area
    gluOrtho2D(0.0, 400.0, 0.0, 400.0);
}

// Function to display the Hut like
// structure on the console
void myDisplay(void)
{
    // Clear the screen buffer
    glClear(GL_COLOR_BUFFER_BIT);

    glPointSize(4.0);

    // Rectangular part of hut
    glColor3f(0.5f, 0.5f, 0.5f);

    // Begin the polygon
    glBegin(GL_POLYGON);

    // Create the polygon
    glVertex2i(40, 40);
    glVertex2i(320, 40);

    glVertex2i(40, 200);
    glVertex2i(320, 200);

    glVertex2i(40, 200);
    glVertex2i(40, 40);

    glVertex2i(320, 200);
    glVertex2i(320, 40);

    glEnd();

    // Right Window Update
    glColor3f(1.0f, 0.0f, 0.0f);

    // Begin the polygon
    glBegin(GL_POLYGON);

    // Create the polygon
    glVertex2i(220, 60);
    glVertex2i(300, 60);

    glVertex2i(220, 150);
    glVertex2i(300, 150);

    glVertex2i(220, 60);
    glVertex2i(220, 150);

    glVertex2i(300, 150);
    glVertex2i(300, 60);

    glEnd();

    // Right Window Update part 2
    glColor3f(1.0f, 0.0f, 0.0f);

    // Begin the polygon
    glBegin(GL_POLYGON);

    // Create the polygon
    glVertex2i(220, 170);
    glVertex2i(300, 170);

    glVertex2i(220, 190);
    glVertex2i(300, 190);

    glVertex2i(220, 170);
    glVertex2i(220, 190);

    glVertex2i(300, 190);
    glVertex2i(300, 170);

    glEnd();

    // Door
    glColor3f(0.60f, 0.42f, 0.16f);

    // Begin the polygon
    glBegin(GL_POLYGON);

    // Create the polygon
    glVertex2i(130, 40);
    glVertex2i(130, 160);

    glVertex2i(130, 160);
    glVertex2i(180, 160);

    glVertex2i(180, 100);
    glVertex2i(180, 40);

    glVertex2i(120, 40);
    glVertex2i(170, 40);

    glEnd();

    // Create Door Part 2
    glColor3f(0.60f, 0.42f, 0.16f);

    // Begin the polygon
    glBegin(GL_POLYGON);

    // Create the polygon
    glVertex2i(130, 170);
    glVertex2i(130, 180);

    glVertex2i(130, 180);
    glVertex2i(180, 180);

    glVertex2i(180, 170);
    glVertex2i(180, 180);

    glVertex2i(130, 170);
    glVertex2i(180, 170);

    glEnd();

    // Hut's top triangle part
    glColor3f(1.0f, 0.0f, 1.0f);

    // Begin the polygon
    glBegin(GL_POLYGON);

    // Create the polygon
    glVertex2i(10, 200);
    glVertex2i(340, 200);

    glVertex2i(200, 390);

    glVertex2i(10, 200);
    glVertex2i(200, 390);

    glEnd();

    // Sends all output to display
    glFlush();
}

// Driver Code
int main(int argc, char** argv)
{
    // Initiaize the init function
    glutInit(&argc, argv);

    // Initialize the toolkit;
    glutInitDisplayMode(
        GLUT_SINGLE | GLUT_RGB);

    // Sets the display mode and
    // specify the colour scheme
    glutInitWindowSize(1200, 740);

    // Specify the window size
    glutInitWindowPosition(0, 0);

    // Sets the starting position
    // for the window
    glutCreateWindow("Basic hut like"
                     " structure");

    // Creates the window and
    // sets the title
    glutDisplayFunc(myDisplay);
    myInit();

    // Additional initializations
    glutMainLoop();

    // Go into a loop until event
    // occurs
    return 0;
}
输出:

要从最佳影片策划和实践问题去学习,检查了C++基础课程为基础,以先进的C++和C++ STL课程基础加上STL。要完成从学习语言到DS Algo等的更多准备工作,请参阅“完整面试准备课程” 。