使用 BERT 进行情绪分类
BERT 代表变形金刚的双向表示,由谷歌 AI 语言的研究人员于 2018 年提出。尽管其主要目的是提高对与谷歌搜索相关的查询含义的理解,但 BERT 已成为最重要和最完整的架构之一各种自然语言任务在句子对分类任务、问答任务等方面产生了最先进的结果。有关架构的更多详细信息,请查看本文
建筑学:
BERT 最重要的特点之一是它的 以最先进的精度执行不同 NLP任务的适应性(类似于我们在计算机视觉中使用的迁移学习)。为此,论文还提出了不同任务的架构。在这篇文章中,我们将使用 BERT 架构进行单句分类任务,特别是用于 CoLA(语言可接受性语料库)二进制分类任务的架构。在上一篇关于 BERT 的文章中,我们详细讨论了 BERT 架构,但让我们回顾一下它的一些重要细节:
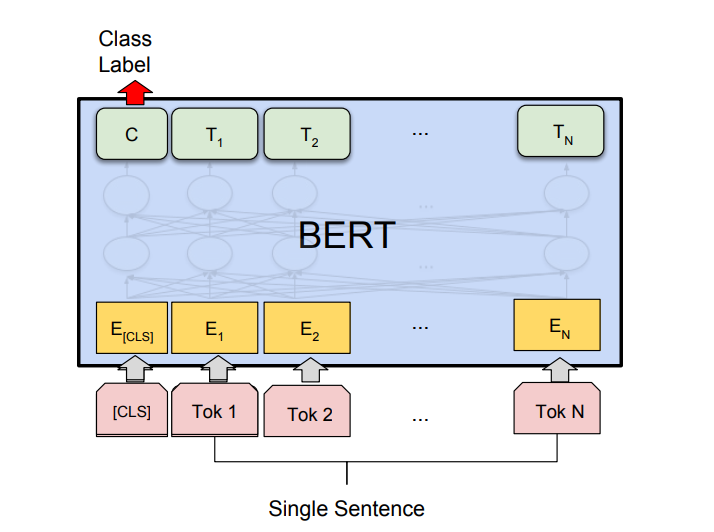
BERT 单句分类任务
BERT 曾在两个版本中提出:
- BERT (BASE):12 层编码器堆栈,具有 12 个双向自注意力头和 768 个隐藏单元。
- BERT(大):24 层编码器堆栈,具有 24 个双向自注意力头和 1024 个隐藏单元。
对于 TensorFlow 实施,Google 提供了 BERT BASE 和 BERT LARGE 的两个版本:Uncased 和 Cased。在不加大小写的版本中,字母在 WordPiece 标记化之前是小写的。
执行:
- 首先,我们需要将 GitHub 存储库克隆到 BERT 以简化设置。
代码:
python3
! git clone https://github.com / google-research / bert.gitpython3
# Download BERT BASE model from tF hub ! wget https://storage.googleapis.com / bert_models / 2018_10_18 / uncased_L-12_H-768_A-12.zip ! unzip uncased_L-12_H-768_A-12.zippython3
% tensorflow_version 1.xpython3
import os
import re
import numpy as np
import pandas as pd
from sklearn.preprocessing import LabelEncoder
from sklearn.model_selection import train_test_split
import tensorflow as tf
from tensorflow import keras
import csv
from sklearn import metrics
python3
# load data from positive and negative directories and a columns that takes there\
# positive and negative label
def load_directory_data(directory):
  data = {}
  data["sentence"] = []
  data["sentiment"] = []
  for file_path in os.listdir(directory):
    with tf.gfile.GFile(os.path.join(directory, file_path), "r") as f:
      data["sentence"].append(f.read())
      data["sentiment"].append(re.match("\d+_(\d+)\.txt", file_path).group(1))
  return pd.DataFrame.from_dict(data)

# Merge positive and negative examples, add a polarity column and shuffle.
def load_dataset(directory):
  pos_df = load_directory_data(os.path.join(directory, "pos"))
  neg_df = load_directory_data(os.path.join(directory, "neg"))
  pos_df["polarity"] = 1
  neg_df["polarity"] = 0
  return pd.concat([pos_df, neg_df]).sample(frac = 1).reset_index(drop = True)

# Download and process the dataset files.
def download_and_load_datasets(force_download = False):
  dataset = tf.keras.utils.get_file(
      fname ="aclImdb.tar.gz",
      origin ="http://ai.stanford.edu/~amaas / data / sentiment / aclImdb_v1.tar.gz",
      extract = True)

  train_df = load_dataset(os.path.join(os.path.dirname(dataset),
                                       "aclImdb", "train"))
  test_df = load_dataset(os.path.join(os.path.dirname(dataset),
                                      "aclImdb", "test"))

  return train_df, test_df
train, test = download_and_load_datasets()
train.shape, test.shape
python3
# sample 5k datapoints for both train and test
train = train.sample(5000)
test = test.sample(5000)
# List columns of train and test data
train.columns, test.columns
python3
# code
# Convert training data into BERT format
train_bert = pd.DataFrame({
  'guid': range(len(train)),
 'label':train['polarity'],
 'alpha': ['a']*train.shape[0],
 'text': train['sentence'].replace(r'\n', '', regex = True)
})

train_bert.head()
print("-----")
# convert test data into bert format
bert_test = pd.DataFrame({
 'id':range(len(test)),
 'text': test['sentence'].replace(r'\n', ' ', regex = True)
})
bert_test.head()
python3
# split  data into  train and validation set
bert_train, bert_val = train_test_split(train_bert, test_size = 0.1)
# save train, validation and testfile to afolder
bert_train.to_csv('bert / IMDB_dataset / train.tsv', sep ='\t', index = False, header = False)
bert_val.to_csv('bert / IMDB_dataset / dev.tsv', sep ='\t', index = False, header = False)
bert_test.to_csv('bert / IMDB_dataset / test.tsv', sep ='\t', index = False, header = True)
python3
# Most of the arguments  hereare self-explanatory but some  arguments needs  to be explained:
# task name:We have discussed this above .Here we need toperform binary  classification that why we use cola
# vocab file :  A vocab file (vocab.txt) to map WordPiece to word id.
# init checkpoint:  A tensorflow checkpoint required. Here we used downloaded bert.
# max_seq_length :caps the maximunumber of words  to each reviews
# bert_config_file: file contains hyperparameter settings ! python bert / run_classifier.py
--task_name = cola --do_train = true --do_eval = true
--data_dir =/content / bert / IMDB_dataset
--vocab_file =/content / uncased_L-12_H-768_A-12 / vocab.txt
--bert_config_file =/content / uncased_L-12_H-768_A-12 / bert_config.json
--init_checkpoint =/content / uncased_L-12_H-768_A-12 / bert_model.ckpt
--max_seq_length = 64
--train_batch_size = 8 --learning_rate = 2e-5
--num_train_epochs = 3.0
--output_dir =/content / bert_output/
--do_lower_case = True
--save_checkpoints_steps 10000
python3
# code to predict bert on test.tsv
# here we use  saved training checkpoint as  initial model ! python bert / run_classifier.py
--task_name = cola
--do_predict = true
--data_dir =/content / bert / IMDB_dataset
--vocab_file =/content / uncased_L-12_H-768_A-12 / vocab.txt
--bert_config_file =/content / uncased_L-12_H-768_A-12 / bert_config.json
--init_checkpoint =/content / bert_output / model.ckpt-0
--max_seq_length = 128
--output_dir =/content / bert_output/
python3
# code
import  csv
label_results =[]
with open('/content / bert_output / test_results.tsv') as file:
    rows = csv.reader(file, delimiter ="\t")
    for row in rows:
      data_1 =[float(i) for i in row]
      label_results.append(data_1.index(max(data_1)))
python3
print("Accuracy", metrics.accuracy_score(test['polarity'], label_results))
print("F1-Score", metrics.f1_score(test['polarity'], label_results))
Cloning into 'bert'...
remote: Enumerating objects: 340, done.
remote: Total 340 (delta 0), reused 0 (delta 0), pack-reused 340
Receiving objects: 100% (340/340), 317.20 KiB | 584.00 KiB/s, done.
Resolving deltas: 100% (185/185), done.- 现在,我们需要使用以下链接下载 BERT BASE模型并将其解压缩到工作目录(或所需位置)。
代码:
蟒蛇3
# Download BERT BASE model from tF hub ! wget https://storage.googleapis.com / bert_models / 2018_10_18 / uncased_L-12_H-768_A-12.zip ! unzip uncased_L-12_H-768_A-12.zip
Archive:  uncased_L-12_H-768_A-12.zip
   creating: uncased_L-12_H-768_A-12/
  inflating: uncased_L-12_H-768_A-12/bert_model.ckpt.meta
  inflating: uncased_L-12_H-768_A-12/bert_model.ckpt.data-00000-of-00001
  inflating: uncased_L-12_H-768_A-12/vocab.txt
  inflating: uncased_L-12_H-768_A-12/bert_model.ckpt.index
inflating: uncased_L-12_H-768_A-12/bert_config.json - 我们将使用 TensorFlow 1x 版本。在 Google colab 中有一个叫做 tensorflow_version 的神奇函数可以切换不同的版本。
代码:
蟒蛇3
% tensorflow_version 1.x
TensorFlow 1.x selected.- 现在,我们将导入运行该项目所需的模块,我们将使用来自 TensorFlow 内置模块的 NumPy、scikit-learn 和 Keras。这些已经预先安装在 colab 中,请确保将它们安装在您的环境中。
代码:
蟒蛇3
import os
import re
import numpy as np
import pandas as pd
from sklearn.preprocessing import LabelEncoder
from sklearn.model_selection import train_test_split
import tensorflow as tf
from tensorflow import keras
import csv
from sklearn import metrics
- 现在我们将加载 IMDB 情感数据集并在训练前进行一些预处理。为了从 TensorFlow Hub 加载 IMDB 数据集,我们将遵循本教程。
代码:
蟒蛇3
# load data from positive and negative directories and a columns that takes there\
# positive and negative label
def load_directory_data(directory):
  data = {}
  data["sentence"] = []
  data["sentiment"] = []
  for file_path in os.listdir(directory):
    with tf.gfile.GFile(os.path.join(directory, file_path), "r") as f:
      data["sentence"].append(f.read())
      data["sentiment"].append(re.match("\d+_(\d+)\.txt", file_path).group(1))
  return pd.DataFrame.from_dict(data)

# Merge positive and negative examples, add a polarity column and shuffle.
def load_dataset(directory):
  pos_df = load_directory_data(os.path.join(directory, "pos"))
  neg_df = load_directory_data(os.path.join(directory, "neg"))
  pos_df["polarity"] = 1
  neg_df["polarity"] = 0
  return pd.concat([pos_df, neg_df]).sample(frac = 1).reset_index(drop = True)

# Download and process the dataset files.
def download_and_load_datasets(force_download = False):
  dataset = tf.keras.utils.get_file(
      fname ="aclImdb.tar.gz",
      origin ="http://ai.stanford.edu/~amaas / data / sentiment / aclImdb_v1.tar.gz",
      extract = True)

  train_df = load_dataset(os.path.join(os.path.dirname(dataset),
                                       "aclImdb", "train"))
  test_df = load_dataset(os.path.join(os.path.dirname(dataset),
                                      "aclImdb", "test"))

  return train_df, test_df
train, test = download_and_load_datasets()
train.shape, test.shape
Downloading data from http://ai.stanford.edu/~amaas/data/sentiment/aclImdb_v1.tar.gz
84131840/84125825 [==============================] - 8s 0us/step
((25000, 3), (25000, 3))- 该数据集包含 50k 条评论 25k 用于每个训练和测试,我们将从每个测试和训练中抽取 5k 条评论。此外,测试和训练数据集都包含 3 列,其列表如下
代码:
蟒蛇3
# sample 5k datapoints for both train and test
train = train.sample(5000)
test = test.sample(5000)
# List columns of train and test data
train.columns, test.columns
(Index(['sentence', 'sentiment', 'polarity'], dtype='object'),
Index(['sentence', 'sentiment', 'polarity'], dtype='object'))- 现在,我们需要转换 BERT 模型训练和预测所需的特定格式,为此我们将使用 pandas 数据帧。以下是 BERT 训练和测试格式所需的列:
- GUID:行的 ID。训练和测试数据都需要
- 类标签.:值 0 或 1,取决于正面和负面情绪。
- alpha:这是一个用于文本分类的虚拟列,但在训练期间是 BERT 预期的。
- text:需要分类的数据点的评论文本。显然需要培训和测试
代码:
蟒蛇3
# code
# Convert training data into BERT format
train_bert = pd.DataFrame({
  'guid': range(len(train)),
 'label':train['polarity'],
 'alpha': ['a']*train.shape[0],
 'text': train['sentence'].replace(r'\n', '', regex = True)
})

train_bert.head()
print("-----")
# convert test data into bert format
bert_test = pd.DataFrame({
 'id':range(len(test)),
 'text': test['sentence'].replace(r'\n', ' ', regex = True)
})
bert_test.head()
guid    label    alpha    text
14930    0    1    a    William Hurt may not be an American matinee id...
1445    1    1    a    Rock solid giallo from a master filmmaker of t...
16943    2    1    a    This movie surprised me. Some things were "cli...
6391    3    1    a    This film may seem dated today, but remember t...
4526    4    0    a    The Twilight Zone has achieved a certain mytho...
-----
guid    text
20010    0    One of Alfred Hitchcock's three greatest films...
16132    1    Hitchcock once gave an interview where he said...
24947    2    I had nothing to do before going out one night...
5471    3    tell you what that was excellent. Dylan Moran ...
21075 4 I watched this show until my puberty but still...- 现在,我们将数据分成三部分:训练、开发和测试,并将其保存到 tsv 文件中,并将其保存到文件夹中(此处为“IMDB 数据集”)。这是因为运行分类器文件需要 tsv 格式的数据集。
代码:
蟒蛇3
# split  data into  train and validation set
bert_train, bert_val = train_test_split(train_bert, test_size = 0.1)
# save train, validation and testfile to afolder
bert_train.to_csv('bert / IMDB_dataset / train.tsv', sep ='\t', index = False, header = False)
bert_val.to_csv('bert / IMDB_dataset / dev.tsv', sep ='\t', index = False, header = False)
bert_test.to_csv('bert / IMDB_dataset / test.tsv', sep ='\t', index = False, header = True)
- 在这一步中,我们使用以下命令训练模型,为了在 colab 上执行 bash 命令,我们使用 !在命令前面签名。 run_classifier 文件在给定命令的帮助下训练模型。由于时间和资源限制,我们将仅在 3 个 epoch 上运行它。
代码:
蟒蛇3
# Most of the arguments  hereare self-explanatory but some  arguments needs  to be explained:
# task name:We have discussed this above .Here we need toperform binary  classification that why we use cola
# vocab file :  A vocab file (vocab.txt) to map WordPiece to word id.
# init checkpoint:  A tensorflow checkpoint required. Here we used downloaded bert.
# max_seq_length :caps the maximunumber of words  to each reviews
# bert_config_file: file contains hyperparameter settings ! python bert / run_classifier.py
--task_name = cola --do_train = true --do_eval = true
--data_dir =/content / bert / IMDB_dataset
--vocab_file =/content / uncased_L-12_H-768_A-12 / vocab.txt
--bert_config_file =/content / uncased_L-12_H-768_A-12 / bert_config.json
--init_checkpoint =/content / uncased_L-12_H-768_A-12 / bert_model.ckpt
--max_seq_length = 64
--train_batch_size = 8 --learning_rate = 2e-5
--num_train_epochs = 3.0
--output_dir =/content / bert_output/
--do_lower_case = True
--save_checkpoints_steps 10000
# Last few lines
INFO:tensorflow:***** Eval results *****
I0713 06:06:28.966619 139722620139392 run_classifier.py:923] ***** Eval results *****
INFO:tensorflow:  eval_accuracy = 0.796
I0713 06:06:28.966814 139722620139392 run_classifier.py:925]   eval_accuracy = 0.796
INFO:tensorflow:  eval_loss = 0.95403963
I0713 06:06:28.967138 139722620139392 run_classifier.py:925]   eval_loss = 0.95403963
INFO:tensorflow:  global_step = 1687
I0713 06:06:28.967317 139722620139392 run_classifier.py:925]   global_step = 1687
INFO:tensorflow:  loss = 0.95741796
I0713 06:06:28.967507 139722620139392 run_classifier.py:925] loss = 0.95741796- 现在我们将使用测试数据通过以下 bash 脚本评估我们的模型。此脚本将预测保存到 tsv 文件中。
代码:
蟒蛇3
# code to predict bert on test.tsv
# here we use  saved training checkpoint as  initial model ! python bert / run_classifier.py
--task_name = cola
--do_predict = true
--data_dir =/content / bert / IMDB_dataset
--vocab_file =/content / uncased_L-12_H-768_A-12 / vocab.txt
--bert_config_file =/content / uncased_L-12_H-768_A-12 / bert_config.json
--init_checkpoint =/content / bert_output / model.ckpt-0
--max_seq_length = 128
--output_dir =/content / bert_output/
INFO:tensorflow:Restoring parameters from /content/bert_output/model.ckpt-1687
I0713 06:08:22.372014 140390020667264 saver.py:1284] Restoring parameters from /content/bert_output/model.ckpt-1687
INFO:tensorflow:Running local_init_op.
I0713 06:08:23.801442 140390020667264 session_manager.py:500] Running local_init_op.
INFO:tensorflow:Done running local_init_op.
I0713 06:08:23.859703 140390020667264 session_manager.py:502] Done running local_init_op.
2020-07-13 06:08:24.453814: I tensorflow/stream_executor/platform/default/dso_loader.cc:44] Successfully opened dynamic library libcublas.so.10
INFO:tensorflow:prediction_loop marked as finished
I0713 06:10:02.280455 140390020667264 error_handling.py:101] prediction_loop marked as finished
INFO:tensorflow:prediction_loop marked as finished
I0713 06:10:02.280870 140390020667264 error_handling.py:101] prediction_loop marked as finished- 下面的代码对每一行测试数据进行最大预测并将其存储到一个列表中。
代码:
蟒蛇3
# code
import  csv
label_results =[]
with open('/content / bert_output / test_results.tsv') as file:
    rows = csv.reader(file, delimiter ="\t")
    for row in rows:
      data_1 =[float(i) for i in row]
      label_results.append(data_1.index(max(data_1)))
- 下面的代码计算准确性和 F1 分数。
代码:
蟒蛇3
print("Accuracy", metrics.accuracy_score(test['polarity'], label_results))
print("F1-Score", metrics.f1_score(test['polarity'], label_results))
Accuracy 0.8548
F1-Score 0.8496894409937888- 我们在 IMDB 评论数据集上实现了 85% 的准确率和 F1 分数,同时只训练了 3 个 epoch 的 BERT (BASE),这是一个相当不错的结果。在更多的 epoch 上进行训练肯定会提高准确性。
参考:
- BERT 论文
- 谷歌 BERT 代码库
- MC.ai BERT 文本分类