当我们希望一个或多个子小部件沿主轴占据所有可用空间时, flutter的扩展小部件会派上用场(对于 Row ,主轴是水平和垂直的Column )。展开的小部件可以作为 Row、Column 和 Flex 的子级。如果我们不想为我们的子小部件提供相等的空间,我们可以使用flex因子根据我们的意愿分配可用空间。 Expanded小部件类似于flutter的Flexible小部件,其 fit 属性默认设置为FlexFit.tight 。扩展小部件基本上是灵活小部件的简写。但是,如果您打算构建响应式应用程序或 Web 应用程序,那么您绝对应该切换到灵活以获得更多适合的选项。
扩展类的构造函数:
const Expanded(
{Key? key,
int flex: 1,
required Widget child}
)
扩展小部件的属性:
- child :此属性设置要放置在Expanded小部件内的小部件树。展开的小部件可以作为 Row、Column 和 Flex 的子级。
- debugTypicalAncestorWidgetClass :此属性将Type作为参数来设置错误消息的ParentData 。
- fit :此属性控制子小部件如何填充可用空间。 flutter提供了两个选项,第一个是FlexFit 。紧,它设置子来填充它可用的空间,第二个是FlexFit.loose ,它允许子小部件与可用空间一样大。
- flex :如果我们决定在子小部件之间不均匀地分配可用空间,那么我们使用flex 因子来做同样的事情。
示例 1:在此示例中,在 Column 内使用了Expanded小部件,其下方是未使用Expanded小部件的应用程序,以显示 UI 的差异。
Dart
import 'package:flutter/material.dart';

void main() {
  runApp(MaterialApp(
    home: Scaffold(
      appBar: AppBar(
          title: Text('Geeksforgeeks'),
          backgroundColor: Colors.greenAccent[400],
          leading: IconButton(
            icon: Icon(Icons.menu),
            tooltip: 'Menu',
            onPressed: () {},
          )),
      body: Center(
          child: Column(
        children: [
          Container(
            child: Center(
              child: Text(
                'First widget',
                style: TextStyle(
                  color: Colors.white,
                ),
              ),
            ),
            color: Colors.blue,
            height: 100,
            width: 200,
          ),
          Expanded(
            child: Container(
              child: Center(
                child: Text(
                  'Second widget',
                  style: TextStyle(
                    color: Colors.white,
                  ),
                ),
              ),
              color: Colors.amber,
              width: 200,
            ),
          ),
          Container(
            child: Center(
              child: Text(
                'Third widget',
                style: TextStyle(
                  color: Colors.white,
                ),
              ),
            ),
            color: Colors.orange,
            height: 100,
            width: 200,
          ),
        ],
      )),
    ),
    debugShowCheckedModeBanner: false,
  ));
}
Dart
import 'package:flutter/material.dart';

void main() {
  runApp(MaterialApp(
    home: Scaffold(
      appBar: AppBar(
          title: Text('Geeksforgeeks'),
          backgroundColor: Colors.greenAccent[400],
          leading: IconButton(
            icon: Icon(Icons.menu),
            tooltip: 'Menu',
            onPressed: () {},
          )),
      body: Center(
          child: Row(
        children: [
          Container(
            child: Center(
              child: Text(
                'First widget',
                style: TextStyle(
                  color: Colors.white,
                ),
              ),
            ),
            color: Colors.blue,
            height: 200,
            width: 100,
          ),
          Expanded(
            child: Container(
              child: Center(
                child: Text(
                  'Second widget',
                  style: TextStyle(
                    color: Colors.white,
                  ),
                ),
              ),
              color: Colors.amber,
              height: 200,
            ),
          ),
          Container(
            child: Center(
              child: Text(
                'Third widget',
                style: TextStyle(
                  color: Colors.white,
                ),
              ),
            ),
            color: Colors.pink,
            height: 200,
            width: 100,
          ),
        ],
      )),
    ),
    debugShowCheckedModeBanner: false,
  ));
}
输出:
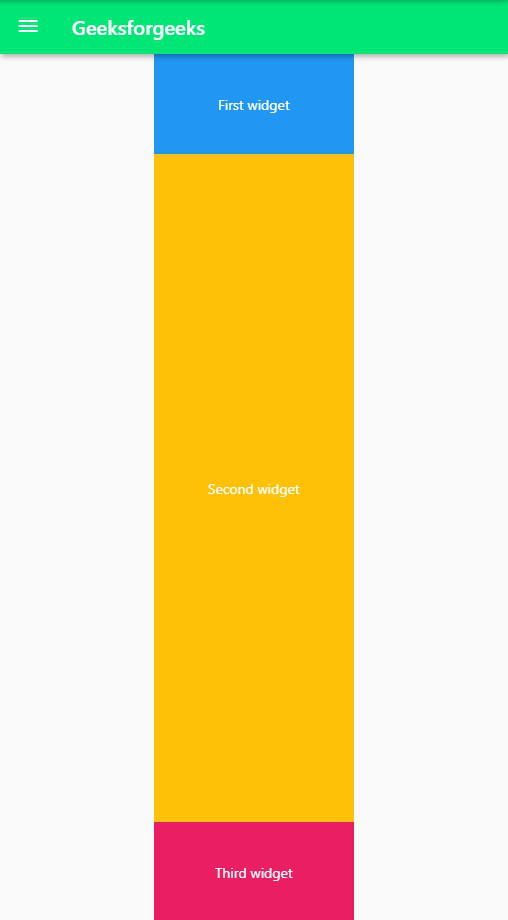
说明:在这个应用程序中,我们首先使用带有前导菜单IconButton的AppBar小部件创建了一个简单的应用程序栏。应用栏的背景颜色设置为greenAccent [ 400 ] 并且标题是一个文本小部件,以“ Geeksforgeeks ”为文本。应用程序主体中的父小部件是Center ,其三个子小部件是Container 。每个 Container 都有 Text 作为它们的子项,指定它们的名称。第一个和第三个容器的高度为 200,宽度为 100,背景颜色分别为蓝色和粉红色。 Second Container是Expanded的子部件,这使它能够占用第一个和第二个Container部件之间的所有可用空间。与第一个和第三个容器类似,它的宽度也是 100。它的背景颜色是蓝绿色。需要注意的一件事是我们没有为此容器指定高度,因为它会占用所有可用空间,即使我们为其指定高度,它也会被Expanded小部件覆盖。
输出:
下面是第二个Container的代码片段。
...
   Container(
              child: Center(
                child: Text(
                  'Second widget',
                  style: TextStyle(
                    color: Colors.white,
                  ),
                ),
              ),
              color: Colors.amber,
              width: 200,
              height: 100,
            ),
...
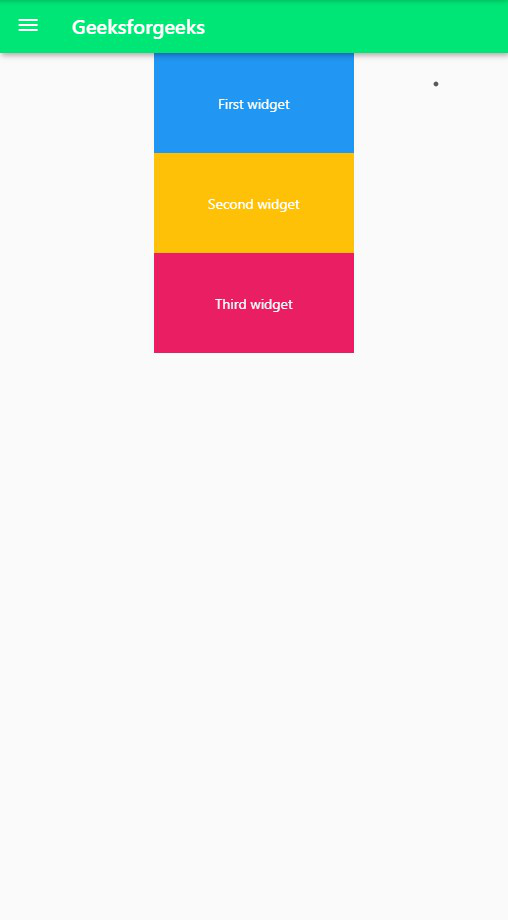
如果我们不为Column 中的第二个Container使用Expanded小部件,则 UI 将是这样的。请注意,在这种情况下我们需要指定高度。
示例 2:在此示例中, Expanded小部件用作Row的子项。旁边是没有Expanded小部件的应用程序,以显示 UI 中的差异。
Dart
import 'package:flutter/material.dart';

void main() {
  runApp(MaterialApp(
    home: Scaffold(
      appBar: AppBar(
          title: Text('Geeksforgeeks'),
          backgroundColor: Colors.greenAccent[400],
          leading: IconButton(
            icon: Icon(Icons.menu),
            tooltip: 'Menu',
            onPressed: () {},
          )),
      body: Center(
          child: Row(
        children: [
          Container(
            child: Center(
              child: Text(
                'First widget',
                style: TextStyle(
                  color: Colors.white,
                ),
              ),
            ),
            color: Colors.blue,
            height: 200,
            width: 100,
          ),
          Expanded(
            child: Container(
              child: Center(
                child: Text(
                  'Second widget',
                  style: TextStyle(
                    color: Colors.white,
                  ),
                ),
              ),
              color: Colors.amber,
              height: 200,
            ),
          ),
          Container(
            child: Center(
              child: Text(
                'Third widget',
                style: TextStyle(
                  color: Colors.white,
                ),
              ),
            ),
            color: Colors.pink,
            height: 200,
            width: 100,
          ),
        ],
      )),
    ),
    debugShowCheckedModeBanner: false,
  ));
}
输出:
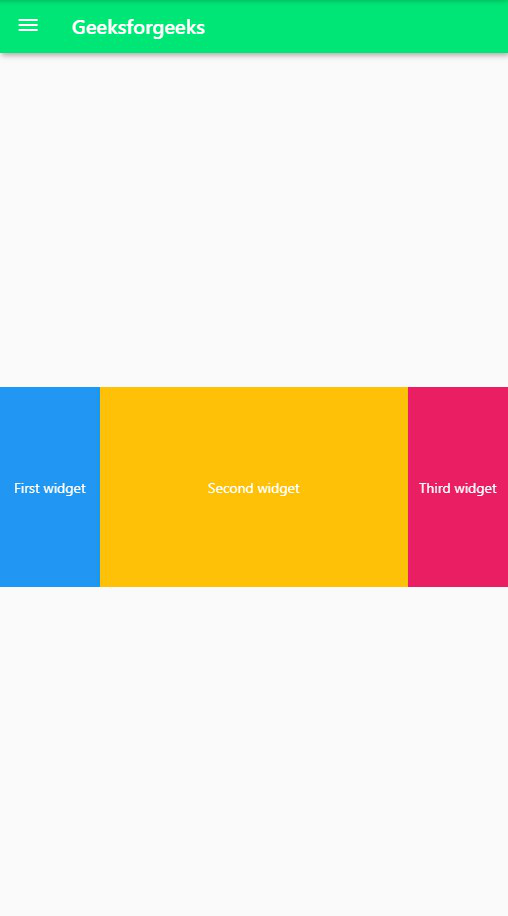
说明:这个app也和第一个例子中的app类似,只是app body中的父widget部分是Row而不是Column ,每个Container的高度都是100。分配给第一个和第三个Container的宽度是200. 此应用程序中的第二个Container是Expanded小部件的子项,这使其能够占据第一个和第三个Containers之间的所有空间。同样,我们没有为第二个容器设置任何宽度,因为它不会计数。
输出:
这是第二个容器的代码片段。
...
   Container(
              child: Center(
                child: Text(
                  'Second widget',
                  style: TextStyle(
                    color: Colors.white,
                  ),
                ),
              ),
              color: Colors.amber,
              width: 100,
              height: 200,
            ),
...
如果我们从第二个Container的父级中删除Expanded小部件,这就是用户界面的机会。在这里,我们还明确指定了第二个Container的宽度。
