📌 相关文章
- JOGL 3D桨轮(1)
- JOGL 3D桨轮
- JOGL 3D对象
- JOGL 3D对象(1)
- JOGL-3D三角形(1)
- JOGL-3D三角形
- JOGL 3D三角形
- JOGL 3D三角形(1)
- JOGL-3D立方体
- 3D基础知识的图标显示
- 3D基础知识的图标显示(1)
- JOGL 3D长方体
- JOGL 3D长方体(1)
- JOGL 3D多维数据集(1)
- JOGL 3D多维数据集
- JOGL类(1)
- JOGL类
- JOGL 3D基本形状
- JOGL 3D基本形状(1)
- Python 3 基础知识(1)
- Python 3 基础知识
- JavaScript 后端基础知识(1)
- JavaScript 后端基础知识
- JOGL安装
- JOGL-安装(1)
- JOGL-安装
- JOGL教程(1)
- JOGL教程
- JOGL转换函数(1)
📜 JOGL-3D基础知识
📅 最后修改于: 2020-11-13 04:57:30 🧑 作者: Mango
在前面的章节中,我们已经了解了如何创建2d对象,对其应用效果以及转换对象。本章教您如何绘制具有3D尺寸和某些形状的线。
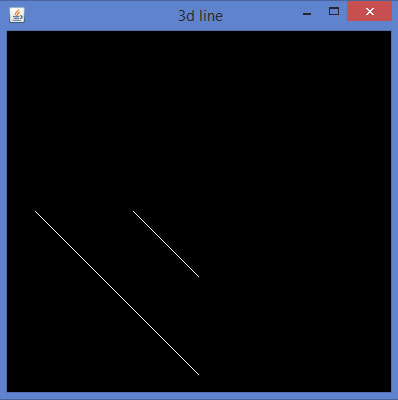
让我们用z轴画一条简单的线,看看2D和3D线之间的区别。首先绘制一条简单的线,然后将第二条线3个单位绘制到窗口中。
让我们通过程序来绘制3D线-
import javax.media.opengl.GL2;
import javax.media.opengl.GLAutoDrawable;
import javax.media.opengl.GLCapabilities;
import javax.media.opengl.GLEventListener;
import javax.media.opengl.GLProfile;
import javax.media.opengl.awt.GLCanvas;
import javax.media.opengl.glu.GLU;

import javax.swing.JFrame;

public class Line3d implements GLEventListener {
   private GLU glu = new GLU();

   @Override

   public void display( GLAutoDrawable drawable ) {
      final GL2 gl = drawable.getGL().getGL2();
      gl.glTranslatef( 0f, 0f, -2.5f );
      gl.glBegin( GL2.GL_LINES );
      gl.glVertex3f( -0.75f,0f,0 );
      gl.glVertex3f( 0f,-0.75f, 0 );
      gl.glEnd();

      //3d line
      gl.glBegin( GL2.GL_LINES );
      gl.glVertex3f( -0.75f,0f,3f );// 3 units into the window
      gl.glVertex3f( 0f,-0.75f,3f );
      gl.glEnd();
   }

   @Override
   public void dispose( GLAutoDrawable arg0 ) {
      //method body
   }

   @Override
   public void init( GLAutoDrawable arg0 ) {
      // method body
   }

   @Override
   public void reshape( GLAutoDrawable drawable, int x, int y, int width, int height ) {

      GL2 gl = drawable.getGL().getGL2();

      if( height <= 0 )
         height = 1;

      final float h = ( float ) width / ( float ) height;
      gl.glViewport( 0, 0, width, height );
      gl.glMatrixMode( GL2.GL_PROJECTION );
      gl.glLoadIdentity();

      glu.gluPerspective( 45.0f, h, 1.0, 20.0 );
      gl.glMatrixMode( GL2.GL_MODELVIEW );
      gl.glLoadIdentity();
   }

   public static void main( String[] args ) {

      //getting the capabilities object of GL2 profile
      final GLProfile profile = GLProfile.get( GLProfile.GL2 );
      GLCapabilities capabilities = new GLCapabilities(profile);

      // The canvas
      final GLCanvas glcanvas = new GLCanvas( capabilities );
      Line3d line3d = new Line3d();
      glcanvas.addGLEventListener( line3d );
      glcanvas.setSize( 400, 400 );

      //creating frame
      final JFrame frame = new JFrame (" 3d line");

      //adding canvas to it
      frame.getContentPane().add( glcanvas );
      frame.setSize(frame.getContentPane().getPreferredSize() );
      frame.setVisible( true );
   }//end of main

}//end of class
编译并执行上述程序时,将生成以下输出-

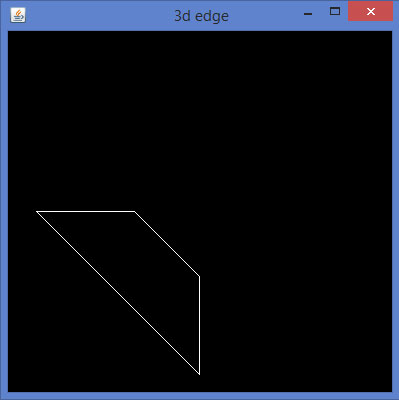
通过将非零值赋予glVertex3f()方法的z象限,可以绘制3D形状,从而生成上述视图。现在,将剩余的线连接起来将导致3D边缘。
现在,以同样的方式让我们开发第三维尺寸的边。
import javax.media.opengl.GL2;
import javax.media.opengl.GLAutoDrawable;
import javax.media.opengl.GLCapabilities;
import javax.media.opengl.GLEventListener;
import javax.media.opengl.GLProfile;
import javax.media.opengl.awt.GLCanvas;
import javax.media.opengl.glu.GLU;

import javax.swing.JFrame;

public class Edge1 implements GLEventListener {
   private GLU glu = new GLU();

   @Override
   public void display(GLAutoDrawable drawable) {

      // TODO Auto-generated method stub
      final GL2 gl = drawable.getGL().getGL2();
      gl.glTranslatef(0f, 0f, -2.5f);
      gl.glBegin(GL2.GL_LINES);
      gl.glVertex3f(-0.75f,0f,0);
      gl.glVertex3f(0f,-0.75f, 0);
      gl.glEnd();

      //3d line
      gl.glBegin(GL2.GL_LINES);

      //3 units in to the window
      gl.glVertex3f(-0.75f,0f,3f);
      gl.glVertex3f(0f,-0.75f,3f);
      gl.glEnd();

      //top
      gl.glBegin(GL2.GL_LINES);
      gl.glVertex3f(-0.75f,0f,0);
      gl.glVertex3f(-0.75f,0f,3f);
      gl.glEnd();

      //bottom
      gl.glBegin(GL2.GL_LINES);
      gl.glVertex3f(0f,-0.75f, 0);
      gl.glVertex3f(0f,-0.75f,3f);
      gl.glEnd();
   }

   @Override
   public void dispose(GLAutoDrawable arg0) {
      //method body
   }

   @Override
   public void init(GLAutoDrawable arg0) {
      // method body
   }

   @Override
   public void reshape(GLAutoDrawable drawable, int x, int y, int width, int height) {

      // TODO Auto-generated method stubfinal
      GL2 gl = drawable.getGL().getGL2();
      if(height <= 0)
         height = 1;

      final float h = (float) width / (float) height;
      gl.glViewport(0, 0, width, height);
      gl.glMatrixMode(GL2.GL_PROJECTION);
      gl.glLoadIdentity();

      glu.gluPerspective(45.0f, h, 1.0, 20.0);
      gl.glMatrixMode(GL2.GL_MODELVIEW);
      gl.glLoadIdentity();

   }

   public static void main(String[] args) {

      //getting the capabilities object of GL2 profile
      final GLProfile profile = GLProfile.get(GLProfile.GL2);
      GLCapabilities capabilities = new GLCapabilities(profile);

      // The canvas
      final GLCanvas glcanvas = new GLCanvas(capabilities);
      Edge1 b = new Edge1();
      glcanvas.addGLEventListener(b);
      glcanvas.setSize(400, 400);

      //creating frame
      final JFrame frame = new JFrame (" 3d edge");

      //adding canvas to it
      frame.getContentPane().add(glcanvas);
      frame.setSize(frame.getContentPane().getPreferredSize());
      frame.setVisible(true);
   }//end of main

}//end of class
编译并执行上述程序时,将生成以下输出-

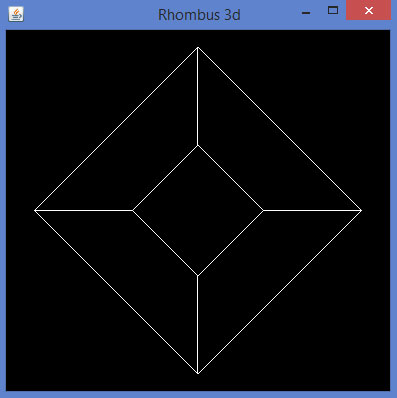
以相同的方式,通过将3D边展开到任何2D四边形的对应边并连接相邻的顶点,可以获得3D四边形。
下面给出了一个使用JOGL绘制菱形的程序。
import javax.media.opengl.GL2;
import javax.media.opengl.GLAutoDrawable;
import javax.media.opengl.GLCapabilities;
import javax.media.opengl.GLEventListener;
import javax.media.opengl.GLProfile;
import javax.media.opengl.awt.GLCanvas;
import javax.media.opengl.glu.GLU;

import javax.swing.JFrame;

public class Rhombus implements GLEventListener {
   private GLU glu = new GLU();

   @Override
   public void display(GLAutoDrawable drawable) {

      final GL2 gl = drawable.getGL().getGL2();
      gl.glTranslatef(0f, 0f, -2.5f);

      //drawing edge1.....
      gl.glBegin(GL2.GL_LINES);
      gl.glVertex3f(-0.75f,0f,0);
      gl.glVertex3f(0f,-0.75f, 0);
      gl.glEnd();

      gl.glBegin(GL2.GL_LINES);
      gl.glVertex3f(-0.75f,0f,3f); // 3 units into the window
      gl.glVertex3f(0f,-0.75f,3f);
      gl.glEnd();

      //top
      gl.glBegin(GL2.GL_LINES);
      gl.glVertex3f(-0.75f,0f,0);
      gl.glVertex3f(-0.75f,0f,3f);
      gl.glEnd();

      // bottom
      gl.glBegin(GL2.GL_LINES);
      gl.glVertex3f(0f,-0.75f, 0);
      gl.glVertex3f(0f,-0.75f,3f);
      gl.glEnd();

      // edge 2....
      gl.glBegin(GL2.GL_LINES);
      gl.glVertex3f(0f,-0.75f, 0);
      gl.glVertex3f(0.75f,0f, 0);
      gl.glEnd();

      gl.glBegin(GL2.GL_LINES);
      gl.glVertex3f(0f,-0.75f, 3f);
      gl.glVertex3f(0.75f,0f, 3f);
      gl.glEnd();

      gl.glBegin(GL2.GL_LINES);
      gl.glVertex3f(0f,-0.75f, 0);
      gl.glVertex3f(0f,-0.75f, 3f);
      gl.glEnd();

      gl.glBegin(GL2.GL_LINES);
      gl.glVertex3f(0.75f,0f, 0);
      gl.glVertex3f(0.75f,0f, 3f);
      gl.glEnd();

      //Edge 3.............
      gl.glBegin(GL2.GL_LINES);
      gl.glVertex3f( 0.0f,0.75f,0);
      gl.glVertex3f(-0.75f,0f,0);
      gl.glEnd();

      gl.glBegin(GL2.GL_LINES);
      gl.glVertex3f( 0.0f,0.75f,3f);
      gl.glVertex3f(-0.75f,0f,3f);
      gl.glEnd();

      gl.glBegin(GL2.GL_LINES);
      gl.glVertex3f( 0.0f,0.75f,0);
      gl.glVertex3f( 0.0f,0.75f,3f);
      gl.glEnd();

      gl.glBegin(GL2.GL_LINES);
      gl.glVertex3f(-0.75f,0f,0);
      gl.glVertex3f(-0.75f,0f,3f);
      gl.glEnd();

      //final edge
      gl.glBegin(GL2.GL_LINES);
      gl.glVertex3f(0.75f,0f, 0);
      gl.glVertex3f( 0.0f,0.75f,0);
      gl.glEnd();

      gl.glBegin(GL2.GL_LINES);
      gl.glVertex3f(0.75f,0f,3f);
      gl.glVertex3f( 0.0f,0.75f,3f);
      gl.glEnd();

      gl.glBegin(GL2.GL_LINES);
      gl.glVertex3f(0.75f,0f, 0);
      gl.glVertex3f(0.75f,0f,3f);
      gl.glEnd();

      gl.glBegin(GL2.GL_LINES);
      gl.glVertex3f( 0.0f,0.75f,0);
      gl.glVertex3f( 0.0f,0.75f,3f);
      gl.glEnd();
   }

   @Override
   public void dispose(GLAutoDrawable arg0) {
      //method body
   }

   @Override
   public void init(GLAutoDrawable arg0) {
      // method body
   }

   @Override
   public void reshape(GLAutoDrawable drawable, int x, int y, int width, int height) {

      // TODO Auto-generated method stub final
      GL2 gl = drawable.getGL().getGL2();
      if(height lt;= 0)
         height = 1;

      final float h = (float) width / (float) height;
      gl.glViewport(3, 6, width, height);
      gl.glMatrixMode(GL2.GL_PROJECTION);
      gl.glLoadIdentity();

      glu.gluPerspective(45.0f, h, 1.0, 20.0);
      gl.glMatrixMode(GL2.GL_MODELVIEW);
      gl.glLoadIdentity();
   }

   public static void main(String[] args) {

      //getting the capabilities object of GL2 profile
      final GLProfile profile = GLProfile.get(GLProfile.GL2);
      GLCapabilities capabilities = new GLCapabilities(profile);

      // The canvas
      final GLCanvas glcanvas = new GLCanvas(capabilities);
      Rhombus b = new Rhombus();
      glcanvas.addGLEventListener(b);
      glcanvas.setSize(400, 400);

      //creating frame
      final JFrame frame = new JFrame (" Rhombus 3d");

      //adding canvas to it
      frame.getContentPane().add(glcanvas);
      frame.setSize(frame.getContentPane().getPreferredSize());
      frame.setVisible(true);
   }//end of main

}//end of classimport javax.media.opengl.GL2;
当您编译并执行上述程序时,将生成以下输出。它显示了使用3D线绘制的菱形。

glBegin()方法的预定义参数可用于绘制3D形状。