- Windows 10开发-云服务(1)
- Windows 10开发-服务(1)
- Windows 10开发教程
- Windows 10开发-资源
- Windows 10开发-资源(1)
- Windows 10开发-简介(1)
- Windows 10开发-简介
- Windows 10开发-导航
- Windows 10开发-导航(1)
- 讨论Windows 10开发(1)
- 讨论Windows 10开发
- Windows 10开发-联网
- Windows 10开发-联网(1)
- Windows 10开发-生命周期
- Windows 10开发-生命周期(1)
- Windows 10开发-第一个应用程序(1)
- Windows 10开发-第一个应用程序
- Windows 10开发-商店
- Windows 10开发-商店(1)
- Windows 10开发-数据绑定
- Windows 10开发-自适应代码(1)
- Windows 10开发-自适应代码
- Windows 10开发-SQLite数据库(1)
- Windows 10开发-SQLite数据库
- Windows 10开发-本地化(1)
- Windows 10开发-本地化
- Windows 10-云
- Windows 10-云(1)
- Windows 10开发-UWP
📅 最后修改于: 2020-11-18 10:12:30 🧑 作者: Mango
在本章中,我们将学习UWP应用程序如何为另一个通用Windows平台(UWP)应用程序提供帮助或提供服务。实际上,本章是背景执行一章的扩展,是本章的特例。
-
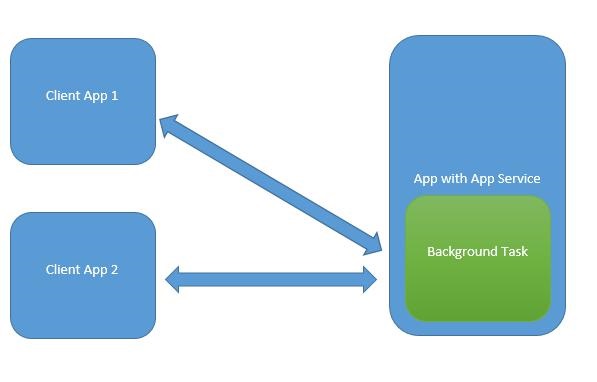
在Windows 10中,应用程序服务是应用程序向其他应用程序提供服务的一种方式或机制。
-
应用程序服务以后台任务的形式工作。
-
前景应用程序可以在另一个应用程序中调用一个应用程序服务以在后台执行任务。

应用程序服务类似于Web服务,但应用程序服务在Windows 10设备上使用。
通用Windows平台(UWP)应用程序可以通过各种方式与另一个UWP应用程序进行交互-
- 使用LaunchUriAsync的URI关联
- 使用LaunchFileAsync进行文件关联
- 使用LaunchUriForResultsAsync启动结果
- 应用服务
当两个应用程序都为前台时使用前三种方式,但是App服务用于后台任务,在这种情况下,客户端应用程序必须位于前台并且可以使用App服务。
应用程序服务在提供非可视服务的应用程序中非常有益,例如,条形码扫描仪,前台应用程序将在其中获取图像并将这些字节发送到应用程序服务以识别条形码。
为了理解所有这些概念,让我们在Microsoft Visual Studio 2015中创建一个名为AppServiceProvider的新UWP项目。
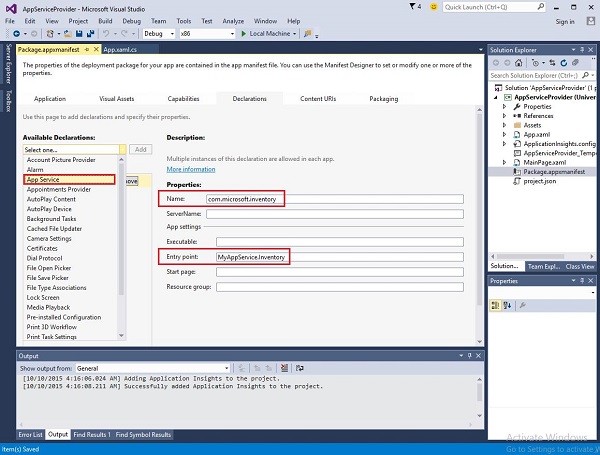
现在,在Package.appmenifest文件中,添加以下信息。

为了创建可由前台应用程序调用的应用程序服务,让我们将一个新的Windows运行时组件项目添加到具有MyAppService名称的解决方案中,因为应用程序服务是作为后台任务实现的。
在AppServiceProvider项目中添加对MyAppService项目的引用。
现在,从MyAppService项目中删除class1.cs文件,并添加一个具有清单名称的新类,该类将实现IBackgrounTask接口。
IBackgrounTask接口只有一种方法“运行” ,该方法需要为后台任务实现。
public sealed class Inventory : IBackgroundTask {
   public void Run(IBackgroundTaskInstance taskInstance) {

   }
}
创建后台任务后,将调用Run()方法,当Run方法完成时,将终止后台任务。为了保持后台任务,处理请求,代码需要延迟。
应用程序服务代码位于OnRequestedReceived()中。在此示例中,库存商品的索引传递给服务,以检索指定库存商品的名称和价格。
private async void OnRequestReceived(AppServiceConnection sender,
   AppServiceRequestReceivedEventArgs args) {
      // Get a deferral because we use an awaitable API below to respond to the message
}
下面给出的是C#中库存类的完整实现。
using System;
using System.Collections.Generic;
using System.Linq;
using System.Text;
using System.Threading.Tasks;

using Windows.ApplicationModel.AppService;
using Windows.ApplicationModel.Background;
using Windows.Foundation.Collections;

namespace MyAppService{
   public sealed class Inventory : IBackgroundTask {

      private BackgroundTaskDeferral backgroundTaskDeferral;
      private AppServiceConnection appServiceconnection;

      private String[] inventoryItems = new string[] { "Robot vacuum", "Chair" };
      private double[] inventoryPrices = new double[] { 129.99, 88.99 };

      public void Run(IBackgroundTaskInstance taskInstance) {
         this.backgroundTaskDeferral = taskInstance.GetDeferral();
         taskInstance.Canceled += OnTaskCanceled;
         var details = taskInstance.TriggerDetails as AppServiceTriggerDetails;

         appServiceconnection = details.AppServiceConnection;
         appServiceconnection.RequestReceived += OnRequestReceived;
      }

      private async void OnRequestReceived(AppServiceConnection sender,
         AppServiceRequestReceivedEventArgs args) {

            var messageDeferral = args.GetDeferral();
            ValueSet message = args.Request.Message;
            ValueSet returnData = new ValueSet();

            string command = message["Command"] as string;
            int? inventoryIndex = message["ID"] as int?;
            if (inventoryIndex.HasValue &&

            inventoryIndex.Value >= 0 &&
            inventoryIndex.Value < inventoryItems.GetLength(0)) {

               switch (command) {

                  case "Price": {
                     returnData.Add("Result", inventoryPrices[inventoryIndex.Value]);
                     returnData.Add("Status", "OK");
                     break;
                  }

                  case "Item": {
                     returnData.Add("Result", inventoryItems[inventoryIndex.Value]);
                     returnData.Add("Status", "OK");
                     break;
                  }

                  default: {
                     returnData.Add("Status", "Fail: unknown command");
                     break;
                  }
               } else {
                  returnData.Add("Status", "Fail: Index out of range");
               }
            }
            await args.Request.SendResponseAsync(returnData);
            messageDeferral.Complete();
      }

      private void OnTaskCanceled(IBackgroundTaskInstance sender,
         BackgroundTaskCancellationReason reason){
            if (this.backgroundTaskDeferral != null) {
               // Complete the service deferral.
               this.backgroundTaskDeferral.Complete();
            }
      }
   }
}
让我们通过添加一个新的空白UWP项目ClientApp来创建一个客户端应用程序,并在XAML文件中添加一个按钮,一个文本框和两个文本块,如下所示。
下面给出了请求App服务的按钮单击事件实现。
using System;

using Windows.ApplicationModel.AppService;
using Windows.Foundation.Collections;

using Windows.UI.Xaml;
using Windows.UI.Xaml.Controls;

// The Blank Page item template is documented at
   http://go.microsoft.com/fwlink/?LinkId=402352&clcid=0x409

namespace ClientApp {

   ///
      /// An empty page that can be used on its own or navigated to within a Frame.
   ///

   public sealed partial class MainPage : Page {

      private AppServiceConnection inventoryService;

      public MainPage() {
         this.InitializeComponent();
      }

      private async void button_Click(object sender, RoutedEventArgs e){

         // Add the connection.
         if (this.inventoryService == null) {

            this.inventoryService = new AppServiceConnection();
            this.inventoryService.AppServiceName = "com.microsoft.inventory";
            this.inventoryService.PackageFamilyName =
               "bb1a8478-8005-46869923-e525ceaa26fc_4sz2ag3dcq60a";

            var status = await this.inventoryService.OpenAsync();

            if (status != AppServiceConnectionStatus.Success) {
               button.Content = "Failed to connect";
               return;
            }
         }

         // Call the service.
         int idx = int.Parse(textBox.Text);
         var message = new ValueSet();

         message.Add("Command", "Item");
         message.Add("ID", idx);

         AppServiceResponse response = await
            this.inventoryService.SendMessageAsync(message);
         string result = "";

         if (response.Status == AppServiceResponseStatus.Success) {
            // Get the data  that the service sent  to us.
            if (response.Message["Status"] as string == "OK") {
               result = response.Message["Result"] as string;
            }
         }

         message.Clear();
         message.Add("Command", "Price");
         message.Add("ID", idx);

         response = await this.inventoryService.SendMessageAsync(message);

         if (response.Status == AppServiceResponseStatus.Success){
            // Get the data that the service sent to us.
            if (response.Message["Status"] as string == "OK") {
               result += " : Price = " + "$"+ response.Message["Result"] as string;
            }
         }

         textBlock.Text = result;
      }
   }
}
要运行此应用程序,您需要在解决方案资源管理器中将ClientApp项目设置为启动项目,然后从“构建”>“部署解决方案”中部署此解决方案。

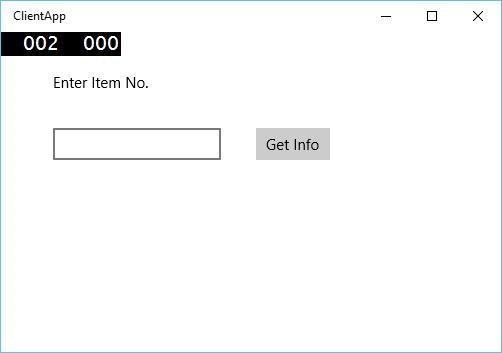
编译并执行上述代码后,您将看到以下窗口。在App服务中,我们刚刚添加了两项信息。因此,您可以输入0或1以获取这些项目的信息。

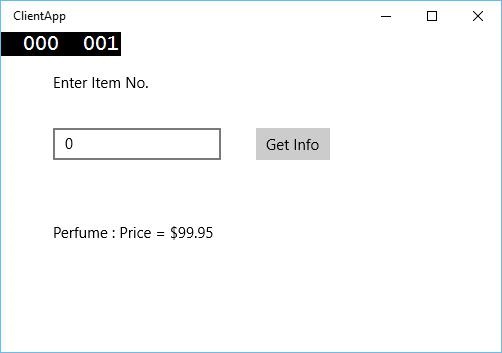
输入0并单击按钮后,它将作为后台任务运行App服务,并将在文本块上显示项目信息。