项目理念 |使用 MERN Stack 构建基于 AR 的音乐学习平台
在本文中,我们将构建一个名为 GuitAR 的基于 AR 的 Web 应用程序。它通过将要弹拨的字符串投射到用户的相机画面中来教用户学习吉他。现在,用户所要做的就是拨动突出显示的字符串来播放特定的歌曲。这是一个示例图像,以便更好地理解。
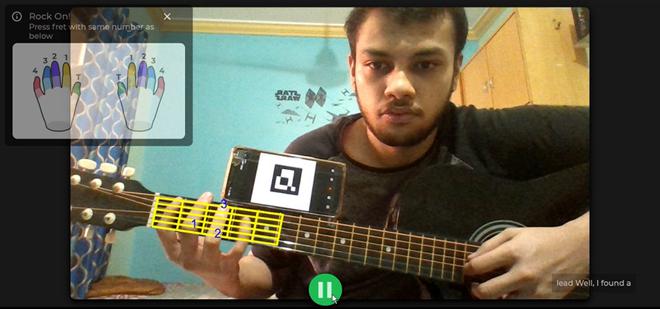
最后结果。 PS:我们在这里使用电话,但打印标记会产生更好的效果。
我们将使用 React JS 作为前端构建这个项目,在 NodeJS 上运行 ExpressJS 作为后端,使用 MongoDB 作为数据库。我们还将使用Selenium、BeautifulSoup4、Pymango 来构建我们的歌曲数据库和 ArucoJS,这是一个流行的 JavaScript CV 库。我们还将使用 Firebase 身份验证将 Google 登录集成到应用程序中。最后,我们将使用 Github Actions 将项目部署在 heroku 上!
本文假设您了解 MERN 堆栈、网络抓取以及一些三角学和坐标几何。我们不会详细介绍基本的前端和后端代码,因为已经有很多很棒的文章涵盖了它,因此我们将主要关注项目的 AR 部分。你可以在 Github Repos 中查看完整的代码。
链接:
- 试试看: https://globalguitar.herokuapp.com/
- 抓取: https://github.com/prathameshbhalekar/GuitAR-scrapping
- 前端: https://github.com/prathameshbhalekar/GuitAR-frontend
- 后端: https://github.com/prathameshbhalekar/GuitAR-Backend
注意:在开始使用技术内容之前,让我们先熟悉一些吉他术语。
- 吉他指法通常被称为“tab”,是一种标记音乐的方法,它使初学者吉他手能够快速轻松地学习歌曲。吉他标签通过向您显示要演奏的音符、演奏多长时间以及使用的技巧来与乐谱符号共享相似之处。这些标签将在一首歌曲中不断变化。我们将需要维护这些选项卡相对于数据库中歌词的更改位置。
- 指板(也称为按品乐器上的指板)是大多数弦乐器的重要组成部分。它是一种薄而长的材料,通常是木头,层压在乐器琴颈的前面。字符串在弦枕和琴桥之间穿过指板。为了演奏乐器,音乐家将字符串向下压到指板上以改变振动长度,从而改变音高。这称为停止字符串。
第 1 步:构建数据库——首先,我们将在 MongoDB atlas 上创建一个数据库。该数据库将包含前面提到的歌词和标签以及用户设置。登录 MongoDB,创建集群并创建数据库。我们将取消 https://www.ultimate-guitar.com/,但您可以随意选择任何其他方法。蜘蛛的脚本可以在链接部分找到。完成报废后,使用以下代码将数据保存到数据库中:
Python3
import os
import pymongo
from dotenv import load_dotenv
load_dotenv()


class Mongo:
    MONGODB_PASSWORD = os.environ.get("MONGODB_PASSWORD")

    # Replace this with your connection url from mongodb
    connection_url = "mongodb+srv://admin:"
        + MONGODB_PASSWORD +
        "@cluster0.jx3fl.mongodb.net/guitarappdb?retryWrites=true&w=majority"
    print(connection_url)

    client = pymongo.MongoClient(connection_url)

    songs = db["songsv2"]

    def __getSchema(self, title, artist, info1, info2, info3, data):
        return {
            "title": title,
            "artist": artist,
            "info1": info1,
            "info2": info2,
            "info3": info3,
            "data": data
        }

    def addSong(self, title, artist, info1, info2, info3, data):
        id = self.songs.insert_one(self.__getSchema(
            title, artist, info1, info2, info3, data
        ))
Javascript
// dbSongs.js
import mongoose from 'mongoose'

const songsSchema = mongoose.Schema({
    title : String,
    artist : String,
    info1 : String,
    info2 : String,
    info3 : String,
    data : String
})

export default mongoose.model('songsv2', songsSchema)
Javascript
// dbUser.js
import mongoose from 'mongoose'

const userSchema = mongoose.Schema({
    email : String,
    displayName : {type : String, default : "User"},
    photoUrl :
        {type : String, default : ""},
    speed : {type : Number, default : 1},
    strokeColor : {type : String, default : "red"},
    textColor : {type : String, default : "black"},
    guitar : {
        m_ratio1 : {type : Number, default : 0},
        n_ratio1 : {type : Number, default : 0},
        m_ratio2 : {type : Number, default : 0},
        n_ratio2 : {type : Number, default : 0},
        m_ratio3 : {type : Number, default : 0},
        n_ratio3 : {type : Number, default : 0},
        m_ratio4 : {type : Number, default : 0},
        n_ratio4 : {type : Number, default : 0},
    }
})

export default mongoose.model('userInfo', userSchema)
Javascript
export default function Map  (origin_x, origin_y , x_axis_x,
                               x_axis_y, m_ratio, n_ratio) {

    // Offset prevent division by 0
    const theta =  Math.atan((x_axis_y - origin_y) /
        (x_axis_x - origin_x + 0.000000001))

    const m = Math.sqrt(Math.pow((origin_x - x_axis_x), 2)
        + Math.pow((origin_y - x_axis_y), 2)) * m_ratio

    const n = Math.sqrt(Math.pow((origin_x - x_axis_x), 2)
        + Math.pow((origin_y - x_axis_y), 2)) * n_ratio

    var x_val = origin_x + m * Math.cos(theta) + n * Math.sin(theta)

    if(origin_x - x_axis_x > 0){
        x_val = origin_x - m * Math.cos(theta) - n * Math.sin(theta)
    }

    var y_val = origin_y + m * Math.sin(theta) - n * Math.cos(theta)

    if(origin_x - x_axis_x > 0){
        y_val = origin_y - m * Math.sin(theta) + n * Math.cos(theta)
    }

    return {
        x : x_val,
        y : y_val
    }
}
Javascript
const SplitLine =  (pt1, pt2, n) => {
    var ans = []
    n--;
    for(var i = 0; i <= n; i ++){
        var x = (pt1.x * (n - i)  + pt2.x * i) / n
        var y = (pt1.y * (n - i)  + pt2.y * i) / n
        ans.push({
            x : x,
            y : y
        })
    }
    return ans
}

export default SplitLine
Javascript
const FindIntersection = (A, B, C, D) => {
    var a1 = B.y - A.y;
    var b1 = A.x - B.x;
    var c1 = a1*(A.x) + b1*(A.y);

    var a2 = D.y - C.y;
    var b2 = C.x - D.x;
    var c2 = a2*(C.x)+ b2*(C.y);

    var determinant = a1*b2 - a2*b1;

    if (determinant === 0)
    {
        return {x: -1, y: -1}
    }
    else
    {
        var x = (b2 * c1 - b1 * c2) / determinant;
        var y = (a1 * c2 - a2 * c1) / determinant;
        return {x: x, y: y};
    }
}

export default FindIntersection
Javascript
import FindIntersection from "../Utils/FindIntersection";
import SplitLine from "../Utils/SplitLine";
import Map from "../Utils/Map";
const AR = require("js-aruco").AR;

const draw = (canvas, video, ptr, list, textColor, strokeColor) => {

  // list is the list of points to be highlighted
  var ctx = canvas.getContext("2d", { alpha: false });

  canvas.width = video.video.videoWidth;

  canvas.height = video.video.videoHeight;

  ctx.translate(canvas.width, 0);
  ctx.scale(-1, 1);
  ctx.drawImage(video.video, 0, 0, canvas.width, canvas.height);
  ctx.scale(-1, 1);
  ctx.translate(-canvas.width, 0);
  ctx.lineWidth = 5;
  const detector = new AR.Detector();
  var markers = detector.detect(ctx.getImageData(0, 0, 1280, 720));

  if (markers.length > 0) {
    const corners = markers[0].corners;
    let pt1, pt2, pt3, pt4;
    pt1 = Map(
      corners[1].x,
      corners[1].y,
      corners[0].x,
      corners[0].y,
      ptr.m_ratio1,
      ptr.n_ratio1
    );
    pt2 = Map(
      corners[1].x,
      corners[1].y,
      corners[0].x,
      corners[0].y,
      ptr.m_ratio2,
      ptr.n_ratio2
    );
    pt3 = Map(
      corners[1].x,
      corners[1].y,
      corners[0].x,
      corners[0].y,
      ptr.m_ratio3,
      ptr.n_ratio3
    );
    pt4 = Map(
      corners[1].x,
      corners[1].y,
      corners[0].x,
      corners[0].y,
      ptr.m_ratio4,
      ptr.n_ratio4
    );

    ctx.strokeStyle = `#${strokeColor}`;

    ctx.beginPath();
    ctx.moveTo(pt1.x, pt1.y);
    ctx.lineTo(pt2.x, pt2.y);
    ctx.lineTo(pt3.x, pt3.y);
    ctx.lineTo(pt4.x, pt4.y);
    ctx.lineTo(pt1.x, pt1.y);
    ctx.stroke();

    var top = SplitLine(pt1, pt2, 6);
    var bottom = SplitLine(pt4, pt3, 6);

    var i;

    for (i = 0; i < top.length; i++) {
      ctx.beginPath();
      ctx.moveTo(top[i].x, top[i].y);
      ctx.lineTo(bottom[i].x, bottom[i].y);
      ctx.stroke();
    }

    var right = SplitLine(pt3, pt2, 6);
    var left = SplitLine(pt4, pt1, 6);
    right.reverse();
    left.reverse();

    for (i = 0; i < right.length; i++) {
      ctx.beginPath();
      ctx.moveTo(right[i].x, right[i].y);
      ctx.lineTo(left[i].x, left[i].y);
      ctx.stroke();
    }

    if (list) {
      for (var pos = 0; pos < list.length; pos++) {
        ctx.font = "30px Arial";
        ctx.fillStyle = `#${textColor}`;
        var res = FindIntersection(
          top[list[pos].x - 1],
          bottom[list[pos].x - 1],
          {
            x: (left[list[pos].y - 1].x + left[list[pos].y].x) / 2,
            y: (left[list[pos].y - 1].y + left[list[pos].y].y) / 2,
          },
          {
            x: (right[list[pos].y - 1].x + right[list[pos].y].x) / 2,
            y: (right[list[pos].y - 1].y + right[list[pos].y].y) / 2,
          }
        );
        ctx.fillText(`${list[pos].fing}`, res.x, res.y + 5);
      }
    } else {
      console.error("Tab Not Found");
    }
  }

  ctx.stroke();
};

export default draw;
Javascript
const Plot = (origin_x, origin_y , x_axis_x,
                 x_axis_y, x_val, y_val) => {

    const theta =  Math.atan((x_axis_y - origin_y)
            / (x_axis_x - origin_x + 0.000000001))

    let a , b;
    if(origin_x - x_axis_x > 0){
        a = origin_x - x_val
        b = origin_y - y_val
    } else {
        a = x_val - origin_x
        b = y_val - origin_y
    }

    const sin = Math.sin(theta)
    const cos = Math.cos(theta)

    const m = a * cos - b * sin
    const n = a * sin - b * cos

    const len =Math.sqrt(
        (Math.pow((origin_x - x_axis_x), 2) +
        Math.pow((origin_y - x_axis_y), 2)))

    return {
        m_ratio : m / len,
        n_ratio : n / len
    }
}

export default Plot
Javascript
const Song = (s) => {
    const LYRICS = 'LYRICS'
    const TAB = 'TAB'

    const list = []

    const getNext = (pos) => {
        pos += 5;
        var tab = ""
        var n = s.length;
        while(pos < n){
            if(s.charAt(pos) === '<')
                break;
            tab += s.charAt(pos)
            pos++;
        }
        return {
            pos : pos + 5,
            tab : tab
        }
    }

    var text = ""
    for (var i = 0; i < s.length; i++) {
        var c = s.charAt(i);
        if(c === '<'){
            if(text !=="")
                list.push({
                    data: text,
                    type: LYRICS
                })
            var tab;
            var res = getNext(i);
            tab = res.tab
            i = res.pos
            text = ""
            list.push({
                type: TAB,
                data: tab
            })
        } else
            text += s.charAt(i)
    }

    if(text !== '')
        list.push({
            type:LYRICS,
            data:text
        })
    return list

}

export default Song
Javascript
import React, { useState, useRef, useEffect } from "react";
import Webcam from "react-webcam";
import axios from "../../Utils/axios";
import "./PlaySong.css";
import { useSelector } from "react-redux";
import Song from "./../../Utils/Song";
import tabs from "./../../Utils/Tabs";
import Promt from "./../../components/Promt/Promt";
import Image from "./../../images/finger_coding.jpg";
import Draw from "../../hooks/Draw";
import RotateDevice from
"./../../animations/RotateDevice/RotateDevice";
export default function PlaySong(props) {
const User = useSelector((state) => state.isLoggedIn).user;
const webcamRef = useRef(null);
const canvasRef = useRef(null);
const points = useRef(null);
const song = useRef(null);
const pos = useRef(0);
const tab = useRef(null);
const getNextTimerId = useRef(null);
const playButton = useRef(null);
const strokeColor = useRef("Red");
const textColor = useRef("Red");
const speed = useRef(2);
const [Text, setText] = useState("");
const [IsPaused, setIsPaused] = useState(true);
const [IsLanscape, setIsLanscape] = useState(
window.matchMedia("(orientation: landscape)").matches
);
var supportsOrientationChange = "onorientationchange" in window,
orientationEvent = supportsOrientationChange
? "orientationchange"
: "resize";
window.addEventListener(
orientationEvent,
function () {
setIsLanscape(window.matchMedia(
"(orientation: landscape)").matches);
},
false
);
function getNext() {
console.log(pos.current);
const LYRICS = "LYRICS";
if (song.current) {
if (pos.current < song.current.length) {
if (song.current[pos.current].type === LYRICS) {
setText(song.current[pos.current].data);
pos.current = pos.current + 1;
}
}
if (pos.current < song.current.length) {
tab.current = song.current[pos.current].data;
pos.current = pos.current + 1;
}
if (pos.current >= song.current.length) {
if (playButton.current)
playButton.current.classList.toggle("pause");
setIsPaused(true);
pos.current = 0;
setText("");
tab.current = null;
return;
}
}
getNextTimerId.current =
setTimeout(getNext, speed.current * 1000);
}
const getAnimation = () => {
const video = webcamRef.current;
const canvas = canvasRef.current;
const ptr = points.current;
if (video && canvas) {
var list = tabs.get(tab.current);
Draw(canvas, video, ptr, list,
textColor.current, strokeColor.current);
window.requestAnimationFrame(() => {
return getAnimation();
});
}
};
useEffect(() => {
var Query = new URLSearchParams(props.location.search);
const getSongUrl = "/api/v1/songs/getFromTitle?title="
+ Query.get("title");
axios.get(getSongUrl).then((res, err) => {
if (err) alert(err);
else {
song.current = Song(res.data.data);
console.log(song.current);
}
});
const getAccountUrl =
"/api/v1/users/findbyemail?email=" + User.email;
axios.get(getAccountUrl).then((res, err) => {
if (err) alert(err);
else {
points.current = res.data.guitar;
speed.current = res.data.speed;
textColor.current = res.data.textColor
strokeColor.current = res.data.strokeColor
}
});
window.requestAnimationFrame(getAnimation);
}, []);
const videoConstraints = {
width: 1280,
height: 720,
facingMode: "user",
};
const playPause = (e) => {
e.target.classList.toggle("pause");
if (IsPaused) getNext();
else if (getNextTimerId.current)
clearTimeout(getNextTimerId.current);
setIsPaused(!IsPaused);
};
return (
<>
{!IsLanscape ? (
{Text}
}
最后,数据库应该看起来像这样,其中
_id:ObjectId("604c6b18ab0d440efde7ae4f")
title:"Drivers License"
artist:"Olivia Rodrigo"
info1:""
info2:"Difficulty: novice"
info3:""
data:"[Verse 1]
      G  I got my driver’s license last week
       Just lik..."
第 2 步:构建后端
1. 设置——创建一个文件夹并在其中运行npm init 。完成设置后编辑package.json使其看起来像这样:
// package.json

{
  "name": "guitar-app-backend",
  "version": "1.0.0",
  "description": "",
  "main": "server.js",
  "type": "module",
  "scripts": {
    "test": "echo \"Error: no test specified\" && exit 1",
    "start": "node server.js"
  },
  "author": "",
  "license": "ISC",
}
这将允许在我们的应用程序中使用 ES6 语法。现在使用 npm 或 yarn 安装 express、 mongoose、dotenv、cors 和 nodemon。
2. 创建模式——我们将首先创建模式以访问我们之前添加到数据库中的歌曲。
Javascript
// dbSongs.js
import mongoose from 'mongoose'

const songsSchema = mongoose.Schema({
    title : String,
    artist : String,
    info1 : String,
    info2 : String,
    info3 : String,
    data : String
})

export default mongoose.model('songsv2', songsSchema)
现在,我们可以创建用户模式来保存用户设置。由于我们不存储任何敏感信息,如密码或财务数据,我们可以在没有任何类型的安全性(如加密)的情况下进行操作。我们将在构建前端时讨论“textColors”和“guitar”等字段。
Javascript
// dbUser.js
import mongoose from 'mongoose'

const userSchema = mongoose.Schema({
    email : String,
    displayName : {type : String, default : "User"},
    photoUrl :
        {type : String, default : ""},
    speed : {type : Number, default : 1},
    strokeColor : {type : String, default : "red"},
    textColor : {type : String, default : "black"},
    guitar : {
        m_ratio1 : {type : Number, default : 0},
        n_ratio1 : {type : Number, default : 0},
        m_ratio2 : {type : Number, default : 0},
        n_ratio2 : {type : Number, default : 0},
        m_ratio3 : {type : Number, default : 0},
        n_ratio3 : {type : Number, default : 0},
        m_ratio4 : {type : Number, default : 0},
        n_ratio4 : {type : Number, default : 0},
    }
})

export default mongoose.model('userInfo', userSchema)
3. 创建端点——现在我们将为 API 编写端点。端点的完整代码可以在链接部分的后端存储库中找到。后端完成后,就可以进行测试了。运行nodemon server.js并使用 postman 测试 API。确保在运行之前设置 .env 文件或将 mongodb 连接 URL 更改为您自己的 URL(如果您打算公开代码,则不推荐)。
4. 设置 CI/CD —使用 git 将代码推送到存储库中的 GitHub。创建您的 Heroku 应用并在 GitHub 机密中添加 Heroku API 密钥和 mongodb 密码。另外,在 Heroku 环境中添加 MongoDB 密码。现在,转到您的存储库,转到操作并设置新的工作流程,如下所示:
name: Build And Deploy

on:
  push:
    branches: [ master ]
  pull_request:
    branches: [ master ]

jobs:
  build:

    name : Build
    runs-on: ubuntu-latest

    strategy:
      matrix:
        node-version: [14.x, 15.x]
    env:
      MONGODB_PASSWORD: ${{secrets.MONGODB_PASSWORD}}

    steps:
    - uses: actions/checkout@v2
    - name: Install Node.js ${{ matrix.node-version }}
      uses: actions/setup-node@v2
      with:
        node-version: ${{ matrix.node-version }}

    - name: Install NPM Package
      run: npm ci

    - name: Build project
      run: npm run build --if-present
      env:
        CI: false

  deploy:
    runs-on: ubuntu-latest

    steps:
      - uses: actions/checkout@v2
      - name: Push to Heroku
        uses: akhileshns/heroku-deploy@v3.4.6
        with:
          heroku_api_key: ${{secrets.HEROKU_API_KEY}}
          heroku_app_name: ""
          heroku_email: ""

      - name: Run a one-line script
run: echo successfully run 注意:如果您计划添加 CI/CD,请确保使用 .env 文件作为 mongodb 连接 URL。
第 3 步:设置前端
1. 创建react app——使用npx create-react-app创建react app。使用 npm 或 yarn 清理默认应用并安装以下依赖项:Dependency Function Aruco JS Computer Vision React GSAP Animation Axios Networking Firebase Google Authentication Material UI Core UI Material UI Icons UI React Redux Global Props React Router Routing React Player Embed Vimeo Video React Webcam Access webcam Three JS 3D Graphics Vanta JS Animated backgrounds
2. 构建登录页面——该页面将使用 Firebase 向用户显示 Google 登录弹出窗口。获取 Google 帐户数据后,使用/api/v1/users/findbyemail和/api/v1/users/create来创建新用户或获取用户设置(如果用户已存在)。从数据库中获取用户数据后,将其存储到 redux 中,以便可以从任何地方访问它。您可以从链接部分的前端存储库中获得完整的代码。结果应该是这样的:

登录页面
3. 建立歌曲页面——该页面将包含用户可以播放的各种歌曲的列表。这可以通过使用/api/v1/songs/get来构建。该端点将页面、限制和查询作为请求查询,这将有助于分页和搜索功能。它还应该包含一个导航栏来导航到不同的页面。您可以从链接部分的前端存储库中获得完整的代码。页面应该是这样的:
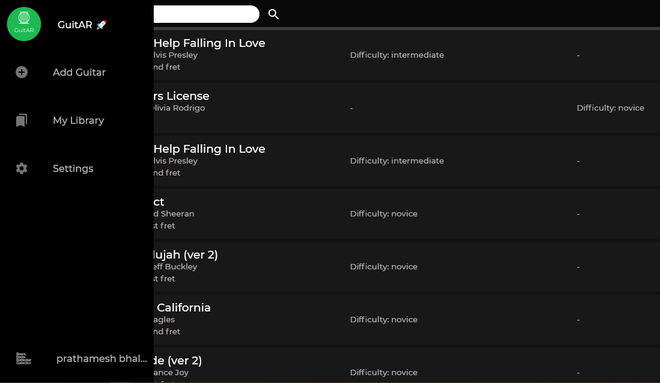
所有歌曲页面
4. 添加设置页面——此页面将让用户设置 AR 投影的颜色和存储在数据库用户模式中的歌曲的速度。当前值可以从我们存储在 redux 中的用户数据中访问。我们可以使用/api/v1/users/updateStrokeColor 、 /api/v1/users/updateSpeed和/api/v1/users/updateTextColor 来更新这些设置。完成后应该是这样的:
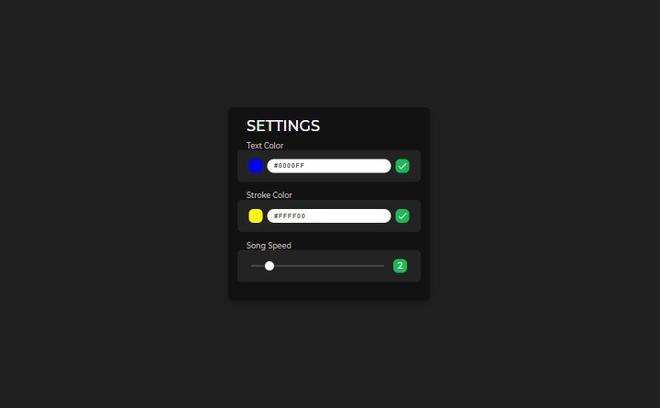
设置页面
第 4 步:构建 AR 辅助函数
现在,我们进入了项目中最艰难但最有趣的部分。在开始之前,让我们了解一下我们解决 AR 问题的方法。在寻求解决方案之前,让我们考虑一下我们对问题所做的一些假设,以获得更简单的解决方案。
假设:
- 设置程序后吉他上标记的位置不会改变。这允许我们在设置期间存储位置数据,并在以后使用它进行绘图。如果位置发生变化,用户必须再次进行设置。
- 吉他与相机平行。这将问题简化为更容易解决的二维问题,同时也减少了计算量。与解决它所需的额外设置和计算相比,计算第三维并没有增加太多功能。我们可以通过确保标记的所有边缘与标记的正方形长度相同来检查这种情况。
- 我们相信用户在设置过程中会精确选择指板的四个角。
现在要定位指板,我们将标记的三个角视为坐标系,使得中心角位于原点,其余两个位于 x 和 y 轴上。现在我们有了轴,我们必须担心这些轴上的映射点。我们不是存储 x 和 y 坐标的实际长度,而是存储它们与标记大小的比率,这允许我们根据标记与相机的距离来缩放距离。
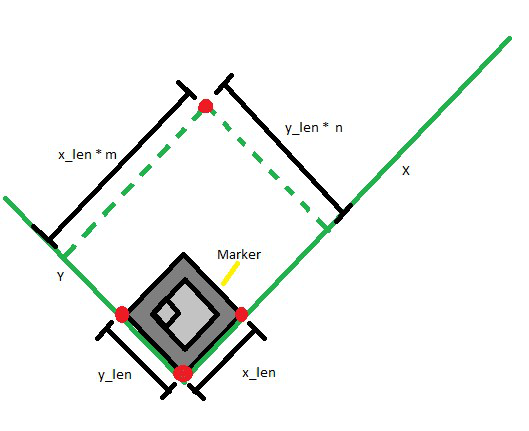
映射点wrt标记
现在我们已经将点映射到标记,我们需要将它们转换为画布坐标。我们可以通过一些基本的三角函数轻松做到这一点。


现在我们可以在 JavaScript 中编写相同的代码:
Javascript
export default function Map  (origin_x, origin_y , x_axis_x,
                               x_axis_y, m_ratio, n_ratio) {

    // Offset prevent division by 0
    const theta =  Math.atan((x_axis_y - origin_y) /
        (x_axis_x - origin_x + 0.000000001))

    const m = Math.sqrt(Math.pow((origin_x - x_axis_x), 2)
        + Math.pow((origin_y - x_axis_y), 2)) * m_ratio

    const n = Math.sqrt(Math.pow((origin_x - x_axis_x), 2)
        + Math.pow((origin_y - x_axis_y), 2)) * n_ratio

    var x_val = origin_x + m * Math.cos(theta) + n * Math.sin(theta)

    if(origin_x - x_axis_x > 0){
        x_val = origin_x - m * Math.cos(theta) - n * Math.sin(theta)
    }

    var y_val = origin_y + m * Math.sin(theta) - n * Math.cos(theta)

    if(origin_x - x_axis_x > 0){
        y_val = origin_y - m * Math.sin(theta) + n * Math.cos(theta)
    }

    return {
        x : x_val,
        y : y_val
    }
}
现在我们有了获得字符串在板上位置所需的四个角。我们可以通过将矩形分成相等的部分来轻松做到这一点。这可以通过以下函数来完成:
Javascript
const SplitLine =  (pt1, pt2, n) => {
    var ans = []
    n--;
    for(var i = 0; i <= n; i ++){
        var x = (pt1.x * (n - i)  + pt2.x * i) / n
        var y = (pt1.y * (n - i)  + pt2.y * i) / n
        ans.push({
            x : x,
            y : y
        })
    }
    return ans
}

export default SplitLine
现在我们有了这些点,我们所要做的就是连接相反的点来绘制字符串。但是在我们开始绘制之前,我们需要找到两个字符串的交点来突出显示要按下的字符串。我们可以使用以下使用基本几何的函数来做到这一点:
Javascript
const FindIntersection = (A, B, C, D) => {
    var a1 = B.y - A.y;
    var b1 = A.x - B.x;
    var c1 = a1*(A.x) + b1*(A.y);

    var a2 = D.y - C.y;
    var b2 = C.x - D.x;
    var c2 = a2*(C.x)+ b2*(C.y);

    var determinant = a1*b2 - a2*b1;

    if (determinant === 0)
    {
        return {x: -1, y: -1}
    }
    else
    {
        var x = (b2 * c1 - b1 * c2) / determinant;
        var y = (a1 * c2 - a2 * c1) / determinant;
        return {x: x, y: y};
    }
}

export default FindIntersection
现在我们有了在画布上绘制所需的一切。这可以使用下面的代码来完成,该代码将要绘制的画布、视频源、标记的当前位置和要突出显示的点列表以及一些设置作为其参数:
Javascript
import FindIntersection from "../Utils/FindIntersection";
import SplitLine from "../Utils/SplitLine";
import Map from "../Utils/Map";
const AR = require("js-aruco").AR;

const draw = (canvas, video, ptr, list, textColor, strokeColor) => {

  // list is the list of points to be highlighted
  var ctx = canvas.getContext("2d", { alpha: false });

  canvas.width = video.video.videoWidth;

  canvas.height = video.video.videoHeight;

  ctx.translate(canvas.width, 0);
  ctx.scale(-1, 1);
  ctx.drawImage(video.video, 0, 0, canvas.width, canvas.height);
  ctx.scale(-1, 1);
  ctx.translate(-canvas.width, 0);
  ctx.lineWidth = 5;
  const detector = new AR.Detector();
  var markers = detector.detect(ctx.getImageData(0, 0, 1280, 720));

  if (markers.length > 0) {
    const corners = markers[0].corners;
    let pt1, pt2, pt3, pt4;
    pt1 = Map(
      corners[1].x,
      corners[1].y,
      corners[0].x,
      corners[0].y,
      ptr.m_ratio1,
      ptr.n_ratio1
    );
    pt2 = Map(
      corners[1].x,
      corners[1].y,
      corners[0].x,
      corners[0].y,
      ptr.m_ratio2,
      ptr.n_ratio2
    );
    pt3 = Map(
      corners[1].x,
      corners[1].y,
      corners[0].x,
      corners[0].y,
      ptr.m_ratio3,
      ptr.n_ratio3
    );
    pt4 = Map(
      corners[1].x,
      corners[1].y,
      corners[0].x,
      corners[0].y,
      ptr.m_ratio4,
      ptr.n_ratio4
    );

    ctx.strokeStyle = `#${strokeColor}`;

    ctx.beginPath();
    ctx.moveTo(pt1.x, pt1.y);
    ctx.lineTo(pt2.x, pt2.y);
    ctx.lineTo(pt3.x, pt3.y);
    ctx.lineTo(pt4.x, pt4.y);
    ctx.lineTo(pt1.x, pt1.y);
    ctx.stroke();

    var top = SplitLine(pt1, pt2, 6);
    var bottom = SplitLine(pt4, pt3, 6);

    var i;

    for (i = 0; i < top.length; i++) {
      ctx.beginPath();
      ctx.moveTo(top[i].x, top[i].y);
      ctx.lineTo(bottom[i].x, bottom[i].y);
      ctx.stroke();
    }

    var right = SplitLine(pt3, pt2, 6);
    var left = SplitLine(pt4, pt1, 6);
    right.reverse();
    left.reverse();

    for (i = 0; i < right.length; i++) {
      ctx.beginPath();
      ctx.moveTo(right[i].x, right[i].y);
      ctx.lineTo(left[i].x, left[i].y);
      ctx.stroke();
    }

    if (list) {
      for (var pos = 0; pos < list.length; pos++) {
        ctx.font = "30px Arial";
        ctx.fillStyle = `#${textColor}`;
        var res = FindIntersection(
          top[list[pos].x - 1],
          bottom[list[pos].x - 1],
          {
            x: (left[list[pos].y - 1].x + left[list[pos].y].x) / 2,
            y: (left[list[pos].y - 1].y + left[list[pos].y].y) / 2,
          },
          {
            x: (right[list[pos].y - 1].x + right[list[pos].y].x) / 2,
            y: (right[list[pos].y - 1].y + right[list[pos].y].y) / 2,
          }
        );
        ctx.fillText(`${list[pos].fing}`, res.x, res.y + 5);
      }
    } else {
      console.error("Tab Not Found");
    }
  }

  ctx.stroke();
};

export default draw;
现在我们已经有了项目 AR 部分所需的代码,剩下的就是在设置过程中从用户单击中获取 m_ration 和 n_ration。这可以通过反转映射函数来完成。
Javascript
const Plot = (origin_x, origin_y , x_axis_x,
                 x_axis_y, x_val, y_val) => {

    const theta =  Math.atan((x_axis_y - origin_y)
            / (x_axis_x - origin_x + 0.000000001))

    let a , b;
    if(origin_x - x_axis_x > 0){
        a = origin_x - x_val
        b = origin_y - y_val
    } else {
        a = x_val - origin_x
        b = y_val - origin_y
    }

    const sin = Math.sin(theta)
    const cos = Math.cos(theta)

    const m = a * cos - b * sin
    const n = a * sin - b * cos

    const len =Math.sqrt(
        (Math.pow((origin_x - x_axis_x), 2) +
        Math.pow((origin_y - x_axis_y), 2)))

    return {
        m_ratio : m / len,
        n_ratio : n / len
    }
}

export default Plot
第 5 步:构建 AR 组件——最后,我们准备好构建 AR 组件所需的所有辅助函数。现在我们可以通过调用 draw函数将它们与视图集成。
1. Building Setup 页面——这个页面允许用户选择他的吉他指板的四个角。我们将使用我们之前构建的绘图函数将每个角的坐标转换为 m_ration 和 n_ration。一旦我们获得了所有四个角的口粮,我们就可以使用 /api/v1/users/updateGuitar 将这些更新保存到我们的数据库中。完成后,页面应如下所示:

2. 存储歌曲——在制作练习页面之前,我们需要一种方法来处理从后端获取的歌曲并存储它们。这可以通过以下函数来完成:
Javascript
const Song = (s) => {
    const LYRICS = 'LYRICS'
    const TAB = 'TAB'

    const list = []

    const getNext = (pos) => {
        pos += 5;
        var tab = ""
        var n = s.length;
        while(pos < n){
            if(s.charAt(pos) === '<')
                break;
            tab += s.charAt(pos)
            pos++;
        }
        return {
            pos : pos + 5,
            tab : tab
        }
    }

    var text = ""
    for (var i = 0; i < s.length; i++) {
        var c = s.charAt(i);
        if(c === '<'){
            if(text !=="")
                list.push({
                    data: text,
                    type: LYRICS
                })
            var tab;
            var res = getNext(i);
            tab = res.tab
            i = res.pos
            text = ""
            list.push({
                type: TAB,
                data: tab
            })
        } else
            text += s.charAt(i)
    }

    if(text !== '')
        list.push({
            type:LYRICS,
            data:text
        })
    return list

}

export default Song
3. 构建歌曲页面——现在我们终于准备好构建用户实际练习吉他的页面了。首先在加载时,我们将从查询中加载歌曲。我们还将拥有称为 pos、tab 和 text 的状态,它们将分别是我们在歌曲列表、当前选项卡和要显示的歌词中的位置。在每个速度间隔之后(例如,如果速度为 2,则在 2 秒后)我们会将这些变量更新为歌曲中的下一个变量。最后,我们将在 requestAnimationFrame 中调用 draw函数来有效地更新画布。完整的代码可以在下面找到:
Javascript
import React, { useState, useRef, useEffect } from "react";
import Webcam from "react-webcam";
import axios from "../../Utils/axios";
import "./PlaySong.css";
import { useSelector } from "react-redux";
import Song from "./../../Utils/Song";
import tabs from "./../../Utils/Tabs";
import Promt from "./../../components/Promt/Promt";
import Image from "./../../images/finger_coding.jpg";
import Draw from "../../hooks/Draw";
import RotateDevice from
"./../../animations/RotateDevice/RotateDevice";
export default function PlaySong(props) {
const User = useSelector((state) => state.isLoggedIn).user;
const webcamRef = useRef(null);
const canvasRef = useRef(null);
const points = useRef(null);
const song = useRef(null);
const pos = useRef(0);
const tab = useRef(null);
const getNextTimerId = useRef(null);
const playButton = useRef(null);
const strokeColor = useRef("Red");
const textColor = useRef("Red");
const speed = useRef(2);
const [Text, setText] = useState("");
const [IsPaused, setIsPaused] = useState(true);
const [IsLanscape, setIsLanscape] = useState(
window.matchMedia("(orientation: landscape)").matches
);
var supportsOrientationChange = "onorientationchange" in window,
orientationEvent = supportsOrientationChange
? "orientationchange"
: "resize";
window.addEventListener(
orientationEvent,
function () {
setIsLanscape(window.matchMedia(
"(orientation: landscape)").matches);
},
false
);
function getNext() {
console.log(pos.current);
const LYRICS = "LYRICS";
if (song.current) {
if (pos.current < song.current.length) {
if (song.current[pos.current].type === LYRICS) {
setText(song.current[pos.current].data);
pos.current = pos.current + 1;
}
}
if (pos.current < song.current.length) {
tab.current = song.current[pos.current].data;
pos.current = pos.current + 1;
}
if (pos.current >= song.current.length) {
if (playButton.current)
playButton.current.classList.toggle("pause");
setIsPaused(true);
pos.current = 0;
setText("");
tab.current = null;
return;
}
}
getNextTimerId.current =
setTimeout(getNext, speed.current * 1000);
}
const getAnimation = () => {
const video = webcamRef.current;
const canvas = canvasRef.current;
const ptr = points.current;
if (video && canvas) {
var list = tabs.get(tab.current);
Draw(canvas, video, ptr, list,
textColor.current, strokeColor.current);
window.requestAnimationFrame(() => {
return getAnimation();
});
}
};
useEffect(() => {
var Query = new URLSearchParams(props.location.search);
const getSongUrl = "/api/v1/songs/getFromTitle?title="
+ Query.get("title");
axios.get(getSongUrl).then((res, err) => {
if (err) alert(err);
else {
song.current = Song(res.data.data);
console.log(song.current);
}
});
const getAccountUrl =
"/api/v1/users/findbyemail?email=" + User.email;
axios.get(getAccountUrl).then((res, err) => {
if (err) alert(err);
else {
points.current = res.data.guitar;
speed.current = res.data.speed;
textColor.current = res.data.textColor
strokeColor.current = res.data.strokeColor
}
});
window.requestAnimationFrame(getAnimation);
}, []);
const videoConstraints = {
width: 1280,
height: 720,
facingMode: "user",
};
const playPause = (e) => {
e.target.classList.toggle("pause");
if (IsPaused) getNext();
else if (getNextTimerId.current)
clearTimeout(getNextTimerId.current);
setIsPaused(!IsPaused);
};
return (
<>
{!IsLanscape ? (
{Text}
}
最后,这个页面应该是这样的:

4. 设置 CI/CD —使用 git 将代码推送到存储库中的 Github。创建您的 Heroku 应用程序并在 GitHub 机密中添加 Heroku API 密钥。现在,转到您的存储库,转到操作并设置新的工作流程,如下所示:
name: Build And Deploy

on:
  push:
    branches: [ main ]
  pull_request:
    branches: [ main ]

jobs:
  build:

    name : Build
    runs-on: ubuntu-latest

    strategy:
      matrix:
        node-version: [14.x, 15.x]
        # See supported Node.js release schedule
        # at https://nodejs.org/en/about/releases/

    steps:
    - uses: actions/checkout@v2
    - name: Install Node.js ${{ matrix.node-version }}
      uses: actions/setup-node@v2
      with:
        node-version: ${{ matrix.node-version }}

    - name: Install NPM Package
      run: npm ci

    - name: Build project
      run: npm run build
      env:
        CI: false

  deploy:
    runs-on: ubuntu-latest

    steps:
      - uses: actions/checkout@v2
      - name: Push to Heroku
        uses: akhileshns/heroku-deploy@v3.4.6
        with:
          heroku_api_key: ${{secrets.HEROKU_API_KEY}}
          heroku_app_name: ""
          heroku_email: ""

      - name: Run a one-line script
run: echo successfully run 输出:现在我们可以试用部署的应用程序,它应该如下所示:
应用:
- Guit.ar 将学习速度提高了大约 40%。它通过向用户提供实时视觉反馈来帮助建立肌肉记忆。视觉反馈 (VFb) 已被证明可以促进运动学习的获取和保持阶段,这与学习吉他等延伸任务的训练相关。
- Guit.ar 是音乐机构和大学的绝佳补充。这有助于远程学习,尤其是在锁定期间。
- 学习吉他会在你演奏任何歌曲之前学习很多多余的东西。 Guit.ar 有助于减少杂乱并从第一天开始播放有趣的音乐。
- 用户可以使用 Guit.ar 将他们的吉他变成音乐游戏。它将吉他变成了街机游戏,其目标是在特定时间内敲击突出显示的字符串。
队友: https://auth.geeksforgeeks.org/user/ayushpandya517/