散景 - 添加小部件
Bokeh 是一个Python数据可视化库,用于创建交互式图表和绘图。它帮助我们制作精美的图表,从简单的绘图到仪表板。使用这个库,我们可以在不编写任何脚本的情况下创建 javascript 生成的可视化。
什么是小部件?
小部件是我们可以与散景应用程序一起使用的交互式控件,以制作可视化的交互式界面。要使用小部件,我们可以将它们添加到文档并定义它们的功能,或者我们可以将它们直接添加到文档根目录,添加到布局中。散景中允许通过两种方式来定义回调功能的方法:
- 使用 CustomJS 回调实现在 HTML 文档中工作的交互性。
- 将散景服务器和设置事件处理程序与 .on_change 或 .on_click 一起使用。
这些事件处理程序是Python中的用户定义函数,可以添加到小部件中,然后在小部件中执行某些操作或更改属性时调用。在向可视化添加小部件之前,我们需要从散景库中导入一些包,例如:
- .io用于显示小部件并制作输出文件。
- .layouts for widget box 将所有小部件包装在其中。
- .models.widgets所有类型的交互式小部件的基类。
在下面的示例中,我们使用output_file()函数将结果存储到文件中 & show()以在浏览器中显示小部件。
按钮
它是一个可点击的按钮小部件,在构造函数中采用三个参数:
- label:字符串参数,用作要显示的按钮的文本标签或标题。
- icon:用于在按钮标题左侧显示图像的可选参数。
- 回调:在发生某些更改(如按钮单击)时调用的自定义 javascript 函数。
这里我们使用 button_type 来指定颜色,如主要(蓝色)、警告(黄色)、成功(绿色)、危险(红色)。
Python3
from bokeh.io import output_file, show
from bokeh.layouts import widgetbox
from bokeh.models.widgets import Button

output_file("button.html")

b1 = Button(label = "Back", button_type = "primary")

show(widgetbox(b1))
Python3
from bokeh.io import output_file, show
from bokeh.layouts import widgetbox
from bokeh.models.widgets import Dropdown

output_file("dropdown_menu.html")

menu = [("Item 1", "item_1"), ("Item 2", "item_2"),
        ("Item 3", "item_3")]
dropdown_menu = Dropdown(label = "Dropdown button",
                         button_type = "warning",
                         menu = menu)

show(widgetbox(dropdown_menu))
Python3
from bokeh.io import output_file, show
from bokeh.layouts import widgetbox
from bokeh.models.widgets import CheckboxButtonGroup

output_file("checkbox_button.html")

cbg= CheckboxButtonGroup(
        labels=["Apple", "Samsung", "Lenovo"], active=[0, 1])

show(widgetbox(cbg))
Python3
from bokeh.io import output_file, show
from bokeh.layouts import widgetbox
from bokeh.models.widgets import RadioButtonGroup

output_file("radio_button.html")

radio_button = RadioButtonGroup(
        labels = ["Apple", "Mango", "Orange"],
  active = 0)

show(widgetbox(radio_button))
Python3
from bokeh.io import output_file, show
from bokeh.layouts import widgetbox
from bokeh.models.widgets import Select

output_file("single_select.html")

select = Select(title="Option:", value="Blue",
                options=["Red", "Yellow", "Blue", "Green"])

show(widgetbox(select))
Python3
from bokeh.io import output_file, show
from bokeh.layouts import widgetbox
from bokeh.models.widgets import Slider

output_file("slider.html")

slider = Slider(start = 0, end = 12,
                value = 5, step = .1,
                title = "Average")

show(widgetbox(slider))
Python3
from bokeh.io import output_file, show
from bokeh.layouts import widgetbox
from bokeh.models.widgets import TextInput

output_file("text_input.html")

text = TextInput(value = "",
                title = "Label:")

show(widgetbox(text))
Python3
from bokeh.io import output_file, show
from bokeh.layouts import widgetbox
from bokeh.models.widgets import Paragraph

output_file("para.html")

para = Paragraph(text = """Encryption is the process of converting
normal message (plaintext) into meaningless message (Cipher text).
Whereas Decryption is the process of converting meaningless message
(Cipher text) into its original form (Plaintext).""",
width = 250, height = 80)

show(widgetbox(para))
Python3
from bokeh.io import show
from bokeh.models import TextAreaInput

text_area = TextAreaInput(value = "Write here",
                          rows = 6, title = "Label:")
show(text_area)
Python3
from bokeh.io import show
from bokeh.models import PasswordInput

password = PasswordInput(placeholder = "Enter password...")
show(password)
Python3
from bokeh.io import show
from bokeh.models import PreText

pretext = PreText(text="""Encryption is the process of converting
normal message (plaintext) into meaningless message (Cipher text).
Whereas Decryption is the process of converting meaningless message
(Cipher text) into its original form (Plaintext)""",
width = 500, height = 120)

show(pretext)
Python3
from bokeh.io import output_file, show
from bokeh.layouts import widgetbox
from bokeh.models.widgets import RadioGroup

output_file("radio_group.html")

radio_g = RadioGroup(
        labels = ["AI", "ML", "Deep Learning"],
  active = 1)

show(widgetbox(radio_g))
Python3
from bokeh.io import output_file, show
from bokeh.layouts import widgetbox
from bokeh.models.widgets import Div

output_file("div.html")

div = Div(text="""
Python is high level programming language.
Its easy to learn because of its syntax.""",
width = 250, height = 100)

show(widgetbox(div))
Python3
from bokeh.io import output_file, show
from bokeh.models.widgets import Toggle

output_file("toggle.html")

toggle = Toggle(label = "Switch",
                button_type = "success",
                width = 250, height = 100)

show(toggle)
Python3
from bokeh.io import show
from bokeh.models.widgets import FileInput

file = FileInput()

show(file)
Python3
import numpy as np

from bokeh.io import show
from bokeh.layouts import column, row
from bokeh.models import Spinner
from bokeh.plotting import figure

x = np.random.rand(10)
y = np.random.rand(10)

a = figure(x_range=(0, 1), y_range=(0, 1))
points = a.scatter(x = x, y = y, size = 4)

spinner = Spinner(title="Glyph size", low = 1,
                  high = 40, step = 0.5, value = 4, width = 80)
spinner.js_link('value', points.glyph, 'size')

show(row(column(spinner, width = 100), a))
Python3
from bokeh.io import show
from bokeh.models import Panel, Tabs
from bokeh.plotting import figure

p1 = figure(plot_width=350, plot_height=300)
p1.circle([1, 2, 3, 4, 5], [6, 7, 2, 4, 5],
          size = 20, color = "red", alpha = 0.5)

tab1 = Panel(child=p1, closable = True,
             title = "circle")

p2 = figure(plot_width = 350, plot_height = 300)
p2.line([1, 2, 3, 4, 5], [6, 7, 2, 4, 5],
        line_width = 3, color = "blue", alpha = 0.5)
tab2 = Panel(child = p2, closable = True, title = "line")

show(Tabs(tabs = [tab1, tab2]))
Python3
from datetime import date
from bokeh.io import show
from bokeh.models import CustomJS, DateRangeSlider

date_range= DateRangeSlider(value = (date(2020, 1, 9),
                                     date(2021, 1, 10)),
                            start = date(2019, 8, 12),
                            end = date(2021, 6, 9))

show(date_range)
Python3
from bokeh.io import show
from bokeh.models import CustomJS, DatePicker

dp = DatePicker(title = 'Select date', value = "2021-06-09",
                min_date = "2020-10-01", max_date = "2021-12-31")
show(dp)
Python3
from datetime import date
from random import randint

from bokeh.io import show
from bokeh.models import ColumnDataSource, DataTable, DateFormatter, TableColumn

data = dict(
        dates=[date(2021, 5, i+1) for i in range(10)],
        downloads=[randint(0, 130) for i in range(10)],
    )
source = ColumnDataSource(data)

columns = [
        TableColumn(field = "dates", title = "Date",
                    formatter = DateFormatter()),
        TableColumn(field = "downloads", title = "Downloads"),
    ]
data_table = DataTable(source = source, columns = columns,
                       width = 400, height = 280)

show(data_table)
Python3
from bokeh.io import show
from bokeh.layouts import column
from bokeh.models import ColorPicker
from bokeh.plotting import Figure

plot = Figure(x_range=(0, 1), y_range=(0, 1),
              plot_width=350, plot_height=400)
line = plot.line(x=(0,1), y=(0,1), color="green",
                 line_width=4)

picker = ColorPicker(title="Line Color")
picker.js_link('color', line.glyph, 'line_color')

show(column(plot, picker))
输出:

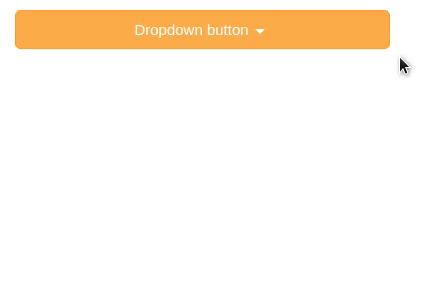
下拉式菜单
这是一个选项列表,每个选项都包含一个垂直菜单。当您单击其中的一个选项时,主菜单下方的选项下拉列表。
它需要三个参数:
- label:显示为菜单标题的文本。
- button_type:指定按钮类型。
- menu:指定可供选择的选项的菜单。
蟒蛇3
from bokeh.io import output_file, show
from bokeh.layouts import widgetbox
from bokeh.models.widgets import Dropdown

output_file("dropdown_menu.html")

menu = [("Item 1", "item_1"), ("Item 2", "item_2"),
        ("Item 3", "item_3")]
dropdown_menu = Dropdown(label = "Dropdown button",
                         button_type = "warning",
                         menu = menu)

show(widgetbox(dropdown_menu))
输出:
复选框按钮组
通过这个小部件,我们可以一次选择多个选项。
这里给出了两个参数:
- 标签:指定要选择的选项的名称。
- 活动:定义一次选择哪个选项(如第一个选项为 0,第二个为 1,依此类推)。
蟒蛇3
from bokeh.io import output_file, show
from bokeh.layouts import widgetbox
from bokeh.models.widgets import CheckboxButtonGroup

output_file("checkbox_button.html")

cbg= CheckboxButtonGroup(
        labels=["Apple", "Samsung", "Lenovo"], active=[0, 1])

show(widgetbox(cbg))
输出:

单选按钮组
此小部件允许一次最多选择一个按钮。
参数:
- 标签:定义选项的名称。
- active:这里我们只能给出一个值,因为在单选按钮组中一次只能选择一个按钮。
蟒蛇3
from bokeh.io import output_file, show
from bokeh.layouts import widgetbox
from bokeh.models.widgets import RadioButtonGroup

output_file("radio_button.html")

radio_button = RadioButtonGroup(
        labels = ["Apple", "Mango", "Orange"],
  active = 0)

show(widgetbox(radio_button))
输出:

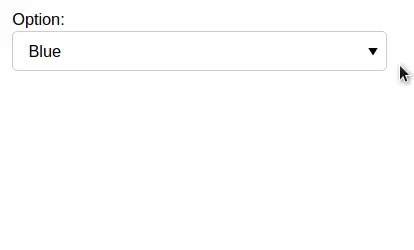
选择
它是一个单选小部件,允许从选项列表中选择一个值。
这里用到的参数是:
- 标题:指定选择小部件的标题。
- value:用于指定要选择的选项中的哪个值。
- 选项:指定可用的选项。
蟒蛇3
from bokeh.io import output_file, show
from bokeh.layouts import widgetbox
from bokeh.models.widgets import Select

output_file("single_select.html")

select = Select(title="Option:", value="Blue",
                options=["Red", "Yellow", "Blue", "Green"])

show(widgetbox(select))
输出:
滑块
滑块具有开始或结束值、步长、初始值和标题等参数。
- 开始:滑块应从哪个值开始。
- end:滑块停止的结束值。
- 值:滑块将停止的值。
- step:该参数指定步长值,表示值之间的跳转。
- 标题:滑块停止的值的标题。
蟒蛇3
from bokeh.io import output_file, show
from bokeh.layouts import widgetbox
from bokeh.models.widgets import Slider

output_file("slider.html")

slider = Slider(start = 0, end = 12,
                value = 5, step = .1,
                title = "Average")

show(widgetbox(slider))
输出:

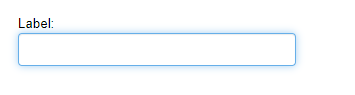
文本输入
这个小部件用于从用户那里收集一行文本。
- 值:在接受用户输入之前最初应该显示什么。
- 标题: TextInput 小部件的标题。
蟒蛇3
from bokeh.io import output_file, show
from bokeh.layouts import widgetbox
from bokeh.models.widgets import TextInput

output_file("text_input.html")

text = TextInput(value = "",
                title = "Label:")

show(widgetbox(text))
输出:
段落
用于显示文本块。
- text:要显示的文本。
- 宽度:高度:指定段落小部件的宽度和高度。
蟒蛇3
from bokeh.io import output_file, show
from bokeh.layouts import widgetbox
from bokeh.models.widgets import Paragraph

output_file("para.html")

para = Paragraph(text = """Encryption is the process of converting
normal message (plaintext) into meaningless message (Cipher text).
Whereas Decryption is the process of converting meaningless message
(Cipher text) into its original form (Plaintext).""",
width = 250, height = 80)

show(widgetbox(para))
输出:

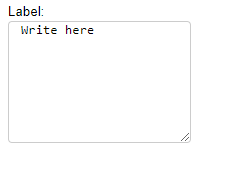
文本区域输入
这用于存储来自用户的多行文本。
- value: Textarea 小部件的默认值。
- 行:作为文本输入空间的行数。
- title:指定 Textarea 小部件的标题。
蟒蛇3
from bokeh.io import show
from bokeh.models import TextAreaInput

text_area = TextAreaInput(value = "Write here",
                          rows = 6, title = "Label:")
show(text_area)
输出:
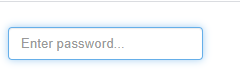
密码输入:
这将隐藏用于密码输入的输入文本输入。
- 占位符:关于要在输入区域输入的数据的简短提示,当用户输入值时,它将被删除。
蟒蛇3
from bokeh.io import show
from bokeh.models import PasswordInput

password = PasswordInput(placeholder = "Enter password...")
show(password)
输出:
借口:
用于显示预先格式化的文本。
- text:要显示的文本。
- 宽度、高度:指定小部件的宽度和高度。
蟒蛇3
from bokeh.io import show
from bokeh.models import PreText

pretext = PreText(text="""Encryption is the process of converting
normal message (plaintext) into meaningless message (Cipher text).
Whereas Decryption is the process of converting meaningless message
(Cipher text) into its original form (Plaintext)""",
width = 500, height = 120)

show(pretext)
输出:

无线电组:
它是收音机盒的集合。
- 标签:指定可供选择的选项的值。
- active:默认值,在选择任何选项之前显示为选中状态。
蟒蛇3
from bokeh.io import output_file, show
from bokeh.layouts import widgetbox
from bokeh.models.widgets import RadioGroup

output_file("radio_group.html")

radio_g = RadioGroup(
        labels = ["AI", "ML", "Deep Learning"],
  active = 1)

show(widgetbox(radio_g))
输出:

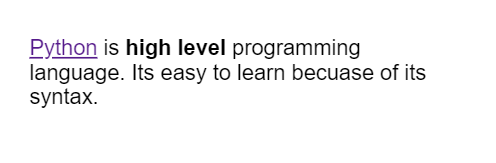
分区:
它是一个小部分或容器,可以在其中完成该部分的各种样式。
- text:要显示的内容。
- 宽度、高度:指定此小部件的宽度和高度。
蟒蛇3
from bokeh.io import output_file, show
from bokeh.layouts import widgetbox
from bokeh.models.widgets import Div

output_file("div.html")

div = Div(text="""
Python is high level programming language.
Its easy to learn because of its syntax.""",
width = 250, height = 100)

show(widgetbox(div))
输出:
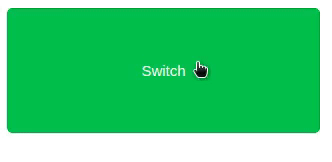
切换
用于显示按钮的选中/取消选中状态或在这两种状态之间更改设置。
- label:要显示为按钮标题的文本。
- button_type:指定按钮的颜色。
- 宽度、高度:指定按钮的宽度和高度。
蟒蛇3
from bokeh.io import output_file, show
from bokeh.models.widgets import Toggle

output_file("toggle.html")

toggle = Toggle(label = "Switch",
                button_type = "success",
                width = 250, height = 100)

show(toggle)
输出:
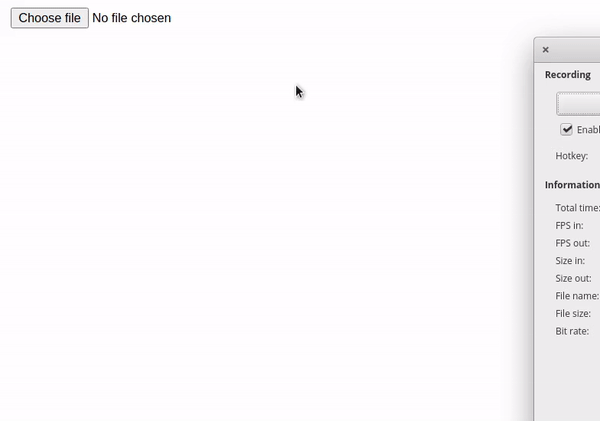
文件输入:
这允许用户选择文件并存储其信息。
蟒蛇3
from bokeh.io import show
from bokeh.models.widgets import FileInput

file = FileInput()

show(file)
输出:
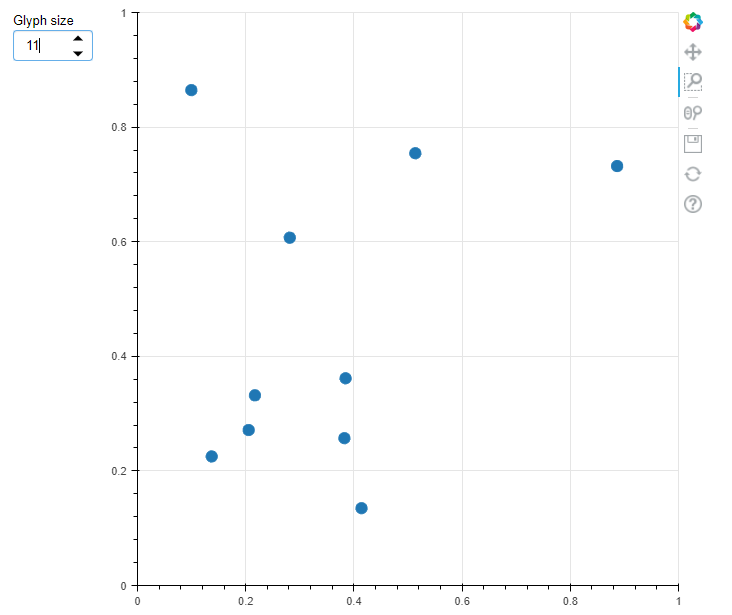
纺纱机:
它提供了一种从集合中选择一个值的快速方法。在这个小部件中,我们使用了不同的库,如 NumPy 等。
- np.random.rand:生成随机数。
- 图:制作散点图的图。
在微调构造函数中,给出了不同的参数,例如:
- 标题:给微调器标题。
- 低、高:指定允许增加下拉菜单中点大小的最低和最高可能值。
- step:该参数指定步长值,表示值之间的跳转。
- 值:菜单的默认值。
- 宽度:定义微调器的宽度。
在这里,我们使用自定义 js 回调(js_link)链接了两个散景模型属性,以便在完成某些操作时更新模型的属性。
蟒蛇3
import numpy as np

from bokeh.io import show
from bokeh.layouts import column, row
from bokeh.models import Spinner
from bokeh.plotting import figure

x = np.random.rand(10)
y = np.random.rand(10)

a = figure(x_range=(0, 1), y_range=(0, 1))
points = a.scatter(x = x, y = y, size = 4)

spinner = Spinner(title="Glyph size", low = 1,
                  high = 40, step = 0.5, value = 4, width = 80)
spinner.js_link('value', points.glyph, 'size')

show(row(column(spinner, width = 100), a))
输出:
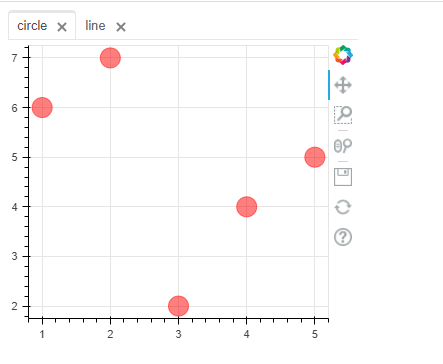
标签:
此小部件允许在可配置面板中显示多个绘图。这个小部件的布局由两个散景模型组成,即 Tab() 和 Panel()。
这里我们使用了 figure() 来制作用于绘图的图形,而 Panel() 是一个具有标题和控件的容器。
- circle():制作圆图。
- line():绘制线图。
蟒蛇3
from bokeh.io import show
from bokeh.models import Panel, Tabs
from bokeh.plotting import figure

p1 = figure(plot_width=350, plot_height=300)
p1.circle([1, 2, 3, 4, 5], [6, 7, 2, 4, 5],
          size = 20, color = "red", alpha = 0.5)

tab1 = Panel(child=p1, closable = True,
             title = "circle")

p2 = figure(plot_width = 350, plot_height = 300)
p2.line([1, 2, 3, 4, 5], [6, 7, 2, 4, 5],
        line_width = 3, color = "blue", alpha = 0.5)
tab2 = Panel(child = p2, closable = True, title = "line")

show(Tabs(tabs = [tab1, tab2]))
输出:
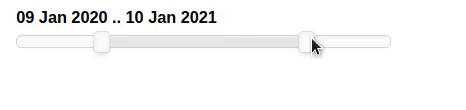
日期范围滑块:
它用于通过滑块选择日期范围。
使用的参数是:
- value:要显示的默认日期范围值。
- 开始:指定滑块应该从哪里开始的起始值。
- 结束:指定滑块应该停止的结束值。
蟒蛇3
from datetime import date
from bokeh.io import show
from bokeh.models import CustomJS, DateRangeSlider

date_range= DateRangeSlider(value = (date(2020, 1, 9),
                                     date(2021, 1, 10)),
                            start = date(2019, 8, 12),
                            end = date(2021, 6, 9))

show(date_range)
输出:
日期选择器:
它是一个基于日历的日期选择小部件。
- 标题:显示为小部件标题的文本。
- value:未选择选项时显示的默认值。
- min_date:最小日期表示日历将从哪个月份和日期开始。
- max_date:最大日期表示日历将从哪个月份和日期结束。
蟒蛇3
from bokeh.io import show
from bokeh.models import CustomJS, DatePicker

dp = DatePicker(title = 'Select date', value = "2021-06-09",
                min_date = "2020-10-01", max_date = "2021-12-31")
show(dp)
输出:

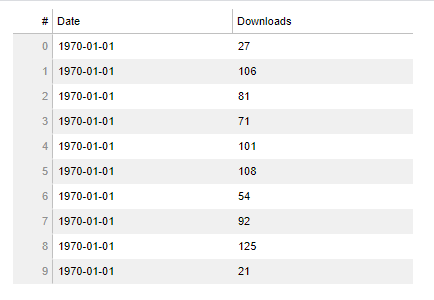
数据表:
它基于一个光滑的网格,该网格将外部组件作为数据源。任何包含这些数据的图都将自动与图和表格链接。
在这里,我们为列值创建了一个字典,然后使用 ColumnDataSource()函数将字典形式的数据列表与列映射,然后我们使用 TableColumn() 将列的布局作为 -
- 字段:列包含哪些值。
- 标题:列的标题。
- formatter:使日期列的格式为日期。
DataTable 构造函数包含:
- 源:定义以列为源的映射数据。
- 列:指定列值。
- 宽度、高度:定义表格的宽度、高度。
蟒蛇3
from datetime import date
from random import randint

from bokeh.io import show
from bokeh.models import ColumnDataSource, DataTable, DateFormatter, TableColumn

data = dict(
        dates=[date(2021, 5, i+1) for i in range(10)],
        downloads=[randint(0, 130) for i in range(10)],
    )
source = ColumnDataSource(data)

columns = [
        TableColumn(field = "dates", title = "Date",
                    formatter = DateFormatter()),
        TableColumn(field = "downloads", title = "Downloads"),
    ]
data_table = DataTable(source = source, columns = columns,
                       width = 400, height = 280)

show(data_table)
输出:
颜色选择器:
这为用户提供选择 RGB 颜色值。
- 图:制作用于绘图的图。
- plot.line:用于制作线图。
蟒蛇3
from bokeh.io import show
from bokeh.layouts import column
from bokeh.models import ColorPicker
from bokeh.plotting import Figure

plot = Figure(x_range=(0, 1), y_range=(0, 1),
              plot_width=350, plot_height=400)
line = plot.line(x=(0,1), y=(0,1), color="green",
                 line_width=4)

picker = ColorPicker(title="Line Color")
picker.js_link('color', line.glyph, 'line_color')

show(column(plot, picker))
输出:
