ElectronJS是一个开源框架,用于使用能够在 Windows、macOS 和 Linux 操作系统上运行的 HTML、CSS 和 JavaScript 等 Web 技术构建跨平台原生桌面应用程序。它将 Chromium 引擎和 NodeJS 组合成一个单一的运行时。
Electron 的核心是一个NodeJS应用程序,具有与本地 OS 环境(如文件系统、系统托盘等)交互的能力。为了创建交互式本地 OS 应用程序,Electron 需要将自身与操作系统功能集成。其中一项关键功能是桌面通知。所有三个操作系统都有发送桌面通知的规定。 Electron 提供了内置的通知模块,允许应用程序发送自定义通知,使用操作系统本地通知 API 来显示它。本教程将演示如何使用通知模块创建自定义桌面通知。
我们假设您熟悉上述链接中介绍的先决条件。为了让 Electron 正常工作,需要在系统中预装node和npm。
Electron 中的通知:通知模块是Main Process的一部分。要在 Renderer Process 中导入和使用 Notification Module,我们可以使用 Electron 提供的 Remote Module。在本教程中,我们还将使用 Electron Remote。有关远程模块的更多详细信息,请参阅此链接。
示例:我们将按照给定的步骤构建基本的电子应用程序。
- 步骤 1:导航到空目录以设置项目,然后运行以下命令,
npm init生成package.json文件。如果没有安装Electron,请使用 npm 安装它。
npm install electron --save-dev此命令还将创建package-lock.json文件并安装所需的node_modules依赖项。成功安装 Electron 后,打开package.json文件并在“scripts”键下执行必要的更改。
包.json:
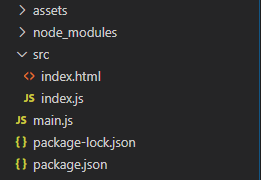
{ "name": "electron-notification", "version": "1.0.0", "description": "Custom notification in Electron", "main": "main.js", "scripts": { "start": "electron" }, "keywords": [ "electron" ], "author": "Radhesh Khanna", "license": "ISC", "dependencies": { "electron": "^8.2.5" } } - 第二步:根据项目结构创建一个main.js文件。该文件是主进程并充当应用程序的入口点。复制以下链接中给出的 main.js文件的样板代码。我们将修改代码以适应我们的项目需要。
主要.js:
const { app, BrowserWindow } = require('electron') function createWindow() { // Create the browser window. const win = new BrowserWindow({ width: 800, height: 600, webPreferences: { nodeIntegration: true } }) // Load the index.html of the app. win.loadFile('src/index.html') // Open the DevTools. win.webContents.openDevTools() } // This method will be called when Electron has finished // initialization and is ready to create browser windows. // Some APIs can only be used after this event occurs. app.whenReady().then(createWindow) // Quit when all windows are closed. app.on('window-all-closed', () => { // On macOS it is common for applications and their // menu bar to stay active until the user quits // explicitly with Cmd + Q if (process.platform !== 'darwin') { app.quit() } }) app.on('activate', () => { // On macOS it's common to re-create a window in the // app when the dock icon is clicked and there are // no other windows open. if (BrowserWindow.getAllWindows().length === 0) { createWindow() } }) // In this file, you can include the rest of your app's // specific main process code. You can also put them in // separate files and require them here. - 第 3 步:在src目录中创建index.html 文件。我们还将从上述链接复制 index.html文件的样板代码。我们将修改代码以适应我们的项目需要。
索引.html:
Hello World! Hello World!
We are using node , Chrome , and Electron . - 输出:此时,我们的基本电子应用程序已设置。要启动 Electron 应用程序,请运行以下命令:
npm start
通知选项:现在我们将在 Windows机器上创建自定义桌面通知。通知模块提供特定于操作系统的某些实例事件、实例方法和选项。如果使用了与本机操作系统不兼容的属性,则它是简单忽略的。下面提供了相同的详细列表。
- 标题:所有操作系统都支持的字符串。通知窗口顶部显示的通知标题
- 副标题:字符串(可选)仅macOS支持。通知的副标题。显示在标题下方
- body: String所有操作系统都支持。通知窗口的主体
- 无声:布尔值(可选)所有操作系统都支持。是否在显示通知时忽略操作系统通知声音
- icon: String (可选)所有操作系统都支持。在通知窗口中显示的图标。出于本教程的目的,使用了保存在“assets”文件夹中的 Electron 徽标的 PNG 图像
- hasReply: Boolean (可选)仅macOS支持。在通知窗口中显示内联回复选项
- 回复占位符:字符串(可选)仅macOS支持。 “hasReply”输入字段的占位符
- 紧急程度:字符串(可选)仅受Linux 支持。通知的紧迫性。值可以是‘normal’ 、 ‘critical’或‘low’ 。
- closeButtonText:字符串(可选)仅macOS支持。通知关闭按钮的自定义标题
- timeoutType: String (可选)在 Windows和Linux操作系统中受支持。通知的超时持续时间。值可以是‘default’或‘never’ 。从 Electron 8.0+ 开始,有一个与此属性相关的错误。将该值设置为‘never’ ,通知应仅在用户手动干预时消失。然而,这种情况并非如此。无论值如何,通知都会自行消失。您可以在此处跟踪错误。
- 操作:对象(可选)仅受macOS 支持。要添加到通知的操作。它是一个对象数组。每个对象都由‘type’和‘text’ 组成。使用此属性存在某些限制。如果定义了多个操作,则仅使用第一个操作。如果提供了多个动作,那么它们将作为附加动作列出,即当鼠标在第一个动作按钮上活动时显示。这种情况也与
hasReplyhasReply: true将被忽略。
有关详细说明,请参阅此链接。 - sound: String (可选)仅macOS支持。显示通知时播放的声音文件。除了自定义声音文件之外,还可以使用 macOS 中存在的任何默认声音。声音文件需要存在于应用程序包中或此链接中提到的以下任何位置。在本教程中,自定义声音文件作为 sound.mp3出现在资产文件夹中
通知模块还为我们提供了一个静态方法,
Notification.isSupported() 。返回一个布尔值,说明当前系统是否支持通知。在index.html文件中,在script标签前添加以下代码。
- 索引.html:
Trigger Custom Notifications in Electron - 输出:

触发器自定义通知按钮没有任何相关功能。我们将向EventListener以触发自定义通知。我们还将向 Notification 对象添加 EventListener。按照项目结构创建index.js文件并执行以下更改。
- 索引.js:
const electron = require('electron');
const path = require('path')

// Importing the Notification Module from Electron,
// Since it is a Part of the Main Process, Using the
// Remote Module to Import it in Renderer Process
const Notification = electron.remote.Notification;

var button = document.getElementById('trigger');

const options = {
    title: 'Custom Notification',
    subtitle: 'Subtitle of the Notification',
    body: 'Body of Custom Notification',
    silent: false,
    icon: path.join(__dirname, '../assets/image.png'),
    hasReply: true,
    timeoutType: 'never',
    replyPlaceholder: 'Reply Here',
    sound: path.join(__dirname, '../assets/sound.mp3'),
    urgency: 'critical'
    closeButtonText: 'Close Button'
    actions: [ {
        type: 'button',
        text: 'Show Button'
    }]
}

// Instantiating a new Notifications Object
// with custom Options
const customNotification = new Notification(options);

button.addEventListener('click', function (event) {
    console.log(Notification.isSupported());

    customNotification.show();
    // customNotification.close();
});

// Instance Events for the new Notification Object
customNotification.addListener('click', () => {
    console.log('Notification is Clicked');
});

customNotification.addListener('show', () => {
    console.log('Notification is shown');
});

customNotification.addListener('close', () => {
    console.log('Notification is Automatically Closed')
});
- customNotification.show()实例方法立即向用户显示通知。如果已显示通知,则取消前一个通知并创建具有相同选项的新通知。
- customNotification.close()取消通知的实例方法。
- 事件:当用户点击通知时, ‘click’ 事件被发出。
- Event: ‘show’事件被发出,当通知显示给用户时。
- 事件:’close’事件被发出,当通知被关闭时。不保证每次都发出。无论“timeoutType”属性如何,通知都会自动关闭。
- 输出:

实例事件:通知模块还提供了另外两个仅macOS 支持的实例事件。
// Emitted when user clicks the reply button from
// 'hasReply: true' property
customNotification.addListener('reply', (event, reply) => {
    console.log('Replied String is - ', reply);
});

// Emitted when the user clicks on any one action
// defined in the actions:[{}] property
customNotification.addListener('action', (event, index) => {
    console.log('Index of the action clicked is - ', index);
});
实例属性:电子通知模块还支持可以设置为通知对象的实例属性。它们可以代替选项使用,也可以在触发自定义通知时更改预定义的选项。详细列表如下。
customNotification.title = 'Title has been Changed';

// Supported in macOS
customNotification.subtitle = 'Subtitle of the Notification';

customNotification.body = 'Body has been changed';

// Supported in macOS
customNotification.closeButtonText = 'Close Button'

// Supported in macOS
customNotification.hasReply = true;

// Supported in macOS
customNotification.replyPlaceholder = 'Reply Placeholder';

customNotification.silent = false;

// Supported in Linux
customNotification.urgency = 'low';

// Supported in Windows and Linux OS
// This is a bug, as described above.
customNotification.timeoutType= 'default';