ElectronJS 中的自定义消息
ElectronJS是一个开源框架,用于使用能够在 Windows、macOS 和 Linux 操作系统上运行的 HTML、CSS 和 JavaScript 等 Web 技术构建跨平台原生桌面应用程序。它将 Chromium 引擎和NodeJS组合成一个单一的运行时。
Electron 应用程序与用户交互的方式之一是通过消息框和警报。有时在应用程序的执行过程中,会出现需要用户注意的情况,或者代码遇到错误,需要让用户意识到这一点。在这种情况下,如果没有用户干预,执行流程就无法向前推进。 Electron 为我们提供了一种方便的技术,通过该技术,用户可以意识到问题并对其采取必要的措施。 Electron 为我们提供了一个内置的对话框模块来显示自定义消息框和警报以与用户交互。本教程将使用对话框模块的实例方法来演示 Electron 中的自定义消息。
我们假设您熟悉上述链接中涵盖的先决条件。为了使 Electron 正常工作,需要在系统中预先安装node和npm 。
Electron 中的自定义消息:对话框模块是Main Process的一部分。要在渲染器进程中导入和使用对话框模块,我们将使用 Electron远程模块。
- 项目结构:
示例:按照给定的步骤在 Electron 中构建自定义消息框。
- 第 1 步:导航到空目录以设置项目,然后运行以下命令,
npm init生成package.json文件。如果没有安装Electron ,请使用 npm 安装。
npm install electron --save这将安装所需的node_modules依赖项。将您选择的任何图像文件复制到资产文件夹并将其命名为image.png 。在本教程中,我们将使用 Electron 徽标作为image.png文件。
包.json:
{ "name": "electron-message", "version": "1.0.0", "description": "Custom Messages in Electron", "main": "main.js", "scripts": { "start": "electron ." }, "keywords": [ "electron" ], "author": "Radhesh Khanna", "license": "ISC", "dependencies": { "electron": "^8.2.5" } } - 第 2 步:有关main.js文件的样板代码,请参阅此链接。我们已经修改了代码以满足我们的项目需求。
主.js:
const { app, BrowserWindow } = require('electron') function createWindow () { // Create the browser window. const win = new BrowserWindow({ width: 800, height: 600, webPreferences: { nodeIntegration: true } }) // Load the index.html of the app. win.loadFile('src/index.html') // Open the DevTools. win.webContents.openDevTools() } // This method will be called when Electron has finished // initialization and is ready to create browser windows. // Some APIs can only be used after this event occurs. /* The 'dialog.showErrorBox()' method can be used before this event occurs. */ // This method is equivalent to 'app.on('ready', function())' app.whenReady().then(createWindow) // Quit when all windows are closed. app.on('window-all-closed', () => { // On macOS it is common for applications and their menu bar // To stay active until the user quits explicitly with Cmd + Q if (process.platform !== 'darwin') { app.quit() } }) app.on('activate', () => { // On macOS it's common to re-create a window in the // app when the dock icon is clicked and there are no // other windows open. if (BrowserWindow.getAllWindows().length === 0) { createWindow() } }) // In this file, you can include the rest of your // app's specific main process code. You can also // Put them in separate files and require them here. - 第三步:在src目录下创建index.html文件和index.js文件。我们还将从上述链接复制index.html文件的样板代码。我们已经修改了代码以满足我们的项目需求。
索引.html:
Hello World! Hello World!
We are using node , Chrome , and Electron .Custom Messages in Electron
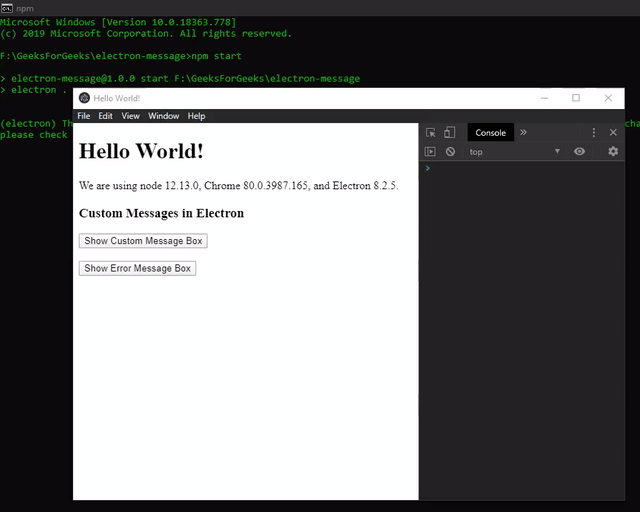
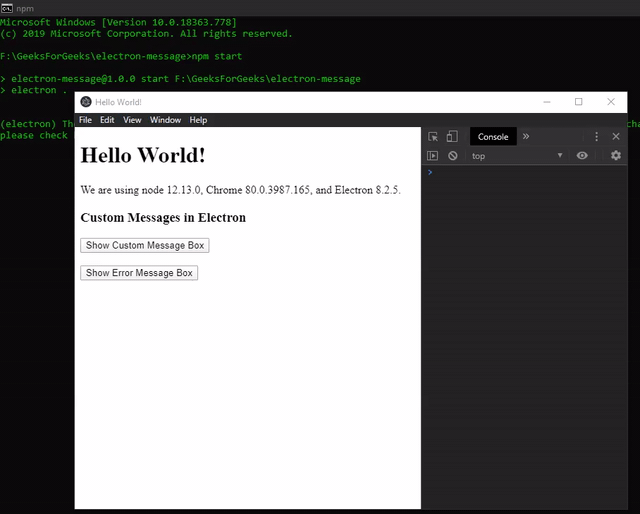
输出:此时,我们的应用程序已设置好,我们可以启动应用程序来检查 GUI 输出。要启动电子应用程序,请运行命令。
npm start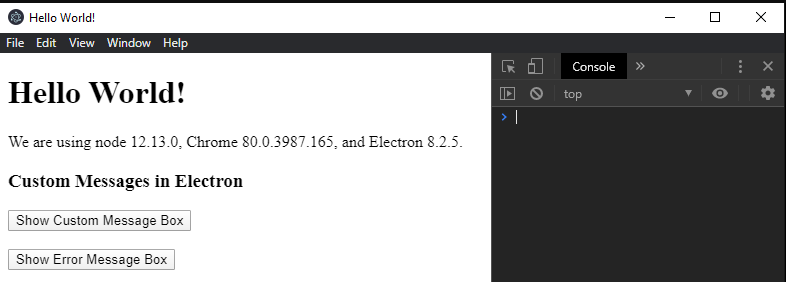
- 第 4 步: “显示自定义消息框”按钮尚无任何相关功能。要更改此设置,请在index.js文件中添加以下代码。
dialog.showMessageBox(browserWindow, options)与选项对象的所有默认/基本值一起使用。使用此 Instance 方法会显示消息框并将阻止应用程序执行,直到消息框通过用户的适当操作成功关闭。它接受以下参数。
- browserWindow: BrowserWindow (可选) BrowserWindow实例。此参数允许对话框将自身附加到父窗口,使其成为modal 。模态窗口是禁用父窗口的子窗口。如果未显示BrowserWindow ,则不会附加对话框。在这种情况下,它将显示为独立窗口。在上面的代码中, BrowserWindow实例没有被传递给对话框,因此对话框在单击“显示自定义消息框”按钮时作为独立窗口打开。
- options: Object它接受以下参数,
- 类型:字符串(可选)它可以保存以下值。
- 没有任何
- 信息
- 错误
- 问题
- 警告
这些值中的每一个都表示您要向用户显示的消息框的类型。默认值为无。在Windows上, question显示与info相同的图标,除非明确设置了icon属性。在macOS 上,警告和错误都显示相同的警告图标。除了默认值之外,这些值中的每一个都有与之关联的默认系统操作系统声音。
- buttons: String[] (可选)它代表一个数组,用于您希望在自定义消息框上显示的按钮标签。一个空数组将导致显示一个按钮,标记为OK 。
- defaultId: Integer (可选)打开自定义消息框时默认选择的
buttons数组中按钮的索引。此属性依赖于noLink属性。这在以下步骤中得到证明。 - title: String (可选)要在消息框上显示的标题。某些操作系统平台及其各自的版本不支持此属性。
- message: String消息框的主要内容。
- detail: String (可选)要在消息属性下方的消息框中显示的额外信息。
- checkboxLabel:字符串(可选)复选框的标签。此属性自动在自定义消息框中包含具有给定标签的复选框。
- checkboxChecked:布尔值(可选)此属性表示复选框的初始状态。此属性的默认值为false 。
- icon: NativeImage (可选)要在消息框上显示的图标。如果定义了此属性,它将覆盖type属性的默认系统图标,而不管其值如何。此属性接受NativeImage实例或图像的文件路径。在本教程中,我们将使用path模块传递位于assets文件夹中的image.png文件的文件路径。
- cancelId:整数(可选)通过Esc键取消对话框时要返回的按钮的索引。默认情况下,这分配给第一个按钮,其中取消或否作为按钮数组属性中的标签。如果不存在此类标签按钮且未设置此选项,则将使用0作为返回值。这在以下步骤中得到证明。
- noLink: Boolean (可选)此属性仅在Windows上受支持。设置此属性后,Electron 将自动尝试找出其中一个按钮是常用按钮标签,例如Cancel 、 Yes 、 No 、 OK等,并将其他按钮标签显示为对话框中的命令链接。此属性用于使对话窗口以现代Windows操作系统应用程序和主题的样式显示。默认情况下,此属性设置为false 。如果使用了所有常用按钮标签,则此属性将无效。此属性在以下步骤中演示。
- normalizeAccessKeys:布尔(可选)跨平台规范化键盘访问键。默认值为false 。启用此属性假定按钮标签中使用了“&”通配符。这些标签将被转换,以便它们在每个平台上相应地工作。 '&'字符在macOS上完全删除,在Linux上转换为_ ,在Windows上不执行任何操作。
- 类型:字符串(可选)它可以保存以下值。
dialog.showMessageBox(browserWindow, options)返回一个Promise 。它解析为包含以下参数的对象,
- response: Integer按按钮数组属性中定义的单击按钮的索引。
- checkboxChecked: Boolean如果设置了checkboxLabel属性,则复选框的选中状态。默认情况下,将返回false 。
index.js:
const electron = require('electron'); const path = require('path'); // Importing dialog module using remote const dialog = electron.remote.dialog; var showBox = document.getElementById('show'); showBox.addEventListener('click', (event) => { // Resolves to a Promise输出:我们现在应该能够在单击“显示自定义消息框”按钮时成功触发基本的自定义消息框。
注意:如果用户在没有成功关闭自定义消息框的情况下尝试继续执行应用程序,控制台上会显示以下消息:
Attempting to call a function in a renderer window that has been closed or released. Function provided here: undefined - 第 5 步:我们现在将修改自定义消息框的选项对象以查看不同的输出,
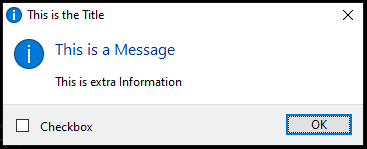
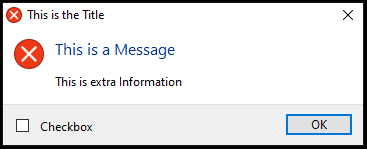
- type: String定义不同类型的消息框。
- 类型:'信息'
- 类型:'警告'

- 类型:'错误'
- 类型:'信息'
- 按钮:字符串[]我们将为按钮数组属性定义自定义标签,并通过更改noLink属性查看各自的输出。
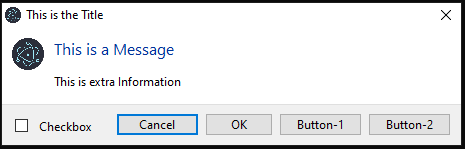
- 按钮: ['Cancel', 'OK', 'Button-1', 'Button-2'] , noLink: false , defaultId: 0
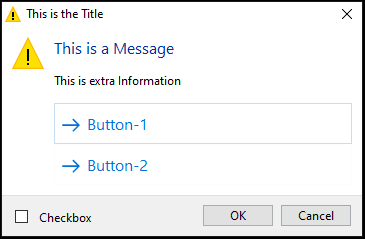
注意:在这种情况下, defaultId属性应该突出显示Cancel按钮,但选择的是Button-1标签。这是由于noLink属性定义的行为。
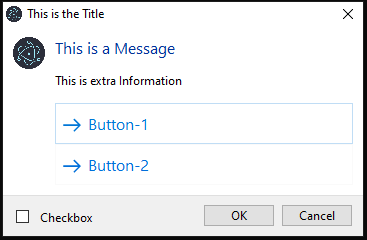
- 按钮: ['Cancel', 'OK', 'Button-1', 'Button-2'] , noLink: true , defaultId: 0
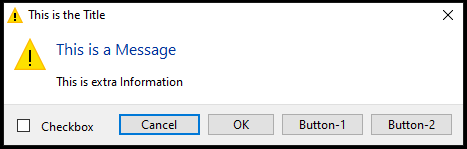
注意:默认情况下会根据预期行为选择取消按钮。
- 按钮: ['Cancel', 'OK', 'Button-1', 'Button-2'] , noLink: false , defaultId: 0
- cancelId:整数评估cancelId属性的行为。通过按键盘上的Esc键调用此行为。
- 按钮: ['Cancel', 'OK', 'Button-1', 'Button-2'] , cancelId: 100 , noLink: true

注意:返回的值为 100,如cancelId属性中设置的那样。
- 按钮: ['Cancel', 'OK', 'Button-1', 'Button-2'] , cancelId: 100 , noLink: false
注意:尽管将cancelId属性值设置为 100,但返回的值为 0。
- 按钮: ['Cancel', 'OK', 'Button-1', 'Button-2'] , cancelId: 100 , noLink: true
- icon: NativeImage我们将传递位于assets文件夹中的image.png文件的文件路径。
- 按钮:['Cancel', 'OK', 'Button-1', 'Button-2'] ,图标:path.join(__dirname, '../assets/image.png') , noLink:true
- 按钮:['Cancel', 'OK', 'Button-1', 'Button-2'] ,图标:path.join(__dirname, '../assets/image.png') , noLink: false
注意:使用icon属性会禁用type属性的默认系统操作系统声音,无论其值如何。
- 按钮:['Cancel', 'OK', 'Button-1', 'Button-2'] ,图标:path.join(__dirname, '../assets/image.png') , noLink:true
我们还可以通过简单地将按钮数组属性的索引值与Promise返回的响应参数进行比较,为消息框中的每个按钮分配不同的行为。
index.js:
.then(box => {
    console.log('Button Clicked Index - ', box.response);
    console.log('Checkbox Checked - ', box.checkboxChecked);

    if (box.response === 0) {
        console.log('Cancel Button was clicked');
    } else if (box.response === 2) {
        console.log('Button-1 was clicked');
    }
 }).catch(err => {
    console.log(err)
 });
输出:

- type: String定义不同类型的消息框。
- 第 6 步: Electron 还为我们提供了一个专门为错误消息设计的实例方法。在上面的代码中,显示错误消息框按钮没有任何关联的功能。要更改这一点,请在index.js文件中添加以下代码。
dialog.showErrorBox(title, info)接受以下参数。它没有任何返回值。此方法不像dialog.showMessageBox()方法那样可自定义,但可以在发出app模块的ready事件之前安全地调用此方法。请参阅main.js文件中突出显示的代码。它通常用于在应用程序启动阶段显示错误。如果在Linux上的app模块的ready事件之前调用,消息将被发送到stderr ,并且不会出现 GUI 对话框。
- title: String错误框的标题。
- info: String要在标题属性下方的错误框中显示的文本信息。
index.js:
var error = document.getElementById('error');

error.addEventListener('click', (event) => {
    dialog.showErrorBox('This is the Title', 'This is the Content');
});
输出: