- ionic 3 警报背景关闭 - TypeScript (1)
- ionic 4与ionic 3
- ionic (1)
- ionic 4与ionic 3(1)
- ionic 段
- ionic 段(1)
- ionic 3 警报背景关闭 - TypeScript 代码示例
- 警报 - Javascript (1)
- 警报库 js (1)
- 警报 - Javascript 代码示例
- ionic 列表(1)
- ionic 列表
- ionic - 任何代码示例
- Ionic键和Ionic化合物(1)
- Ionic键和Ionic化合物
- ionic安装(1)
- ionic安装
- ionic - Shell-Bash (1)
- php代码示例中的警报
- php代码示例中的警报
- ionic 输入(1)
- ionic 输入
- js 警报 - Javascript (1)
- ionic 按钮
- ionic 按钮(1)
- ionic 选择
- ionic 选择(1)
- ionic 新项目 (1)
- ionic 颜色
📅 最后修改于: 2021-01-03 04:46:29 🧑 作者: Mango
离子警报
警报是一个对话框,通知用户重要信息以做出决定或提供选择特定操作或操作列表的能力。它出现在应用程序内容的顶部。在恢复与应用程序的交互之前,用户可以手动将其关闭。它还可以包括标题,子标题和消息选项。
可以将警报视为浮动模式,应将其用于快速响应,例如密码验证,小应用程序通知等。警报非常灵活,可以轻松自定义。
警报控制器
警报控制器负责在Ionic应用程序中创建警报。它使用create()方法创建警报,并且可以通过在create()方法中传递alert选项进行自定义。
警报可以分为多种类型,如下所示。
1.基本警报
这些类型的警报用于将新信息通知用户。该信息具有不同的类型,例如应用程序的更改,有关新功能,需要确认的紧急情况或作为向用户确认操作成功或失败的确认通知。以下示例说明了基本警报的用法。
例
在此打字稿文件中,我们首先需要导入Alert Controller 。然后,创建一个showAlert()函数,其中包含警报选项,例如标题,子标题,消息和按钮。之后,我们创建一个onDidDismiss()方法来恢复与应用程序的交互。
主页
import { Component } from '@angular/core';
import { AlertController } from '@ionic/angular';

@Component({
  selector: 'app-home',
  templateUrl: 'home.page.html',
  styleUrls: ['home.page.scss'],
})
export class HomePage {
  constructor(public alertCtrl: AlertController) { }

  async showAlert() {
    const alert = await this.alertCtrl.create({
      header: 'Alert',
      subHeader: 'SubTitle',
      message: 'This is an alert message',
      buttons: ['OK']
    });
    await alert.present();
    const result = await alert.onDidDismiss();
    console.log(result);
  }
}
Home.page.html
在此文件中,我们将创建一个button 。当我们按下按钮时,它将调用showAlert()函数。 showAlert()函数的实现在home.page.ts文件中定义。
    Ionic Alert


    Basic Alert
输出:
当您运行该应用程序时,它将显示以下屏幕。当您单击按钮时,您将立即收到警报消息。现在,单击“确定”按钮,警报消息将消失。


2.多按钮警报
此类警报用于提供多个警报按钮。它与基本警报类型相似,不同之处在于它包含多个按钮而不是单个按钮。在这里,最右边的按钮用作主按钮。
例
主页
import { Component } from '@angular/core';
import { AlertController } from '@ionic/angular';

@Component({
  selector: 'app-home',
  templateUrl: 'home.page.html',
  styleUrls: ['home.page.scss'],
})
export class HomePage {
  constructor(public alertCtrl: AlertController) { }
  async showMultipleAlertButtons() {
    const alert = await this.alertCtrl.create({
      header: 'MultipleButtonAlert',
      subHeader: 'SubTitle',
      message: 'This is an multiple button alert message',
      buttons: ['Cancel', 'Save', 'Open']
    });
    await alert.present();
  }
}
Home.page.html
    Ionic Alert


    Multiple Button Alert
输出:
运行应用程序时,将获得以下输出。

3.提示警报
提示警报用于输入数据或信息。有时,我们可以使用它在继续前进到应用程序之前向用户询问密码。以下示例对其进行了更清晰的说明。
例
主页
import { Component } from '@angular/core';
import { AlertController } from '@ionic/angular';

@Component({
  selector: 'app-home',
  templateUrl: 'home.page.html',
  styleUrls: ['home.page.scss'],
})
export class HomePage {
  constructor(public alertCtrl: AlertController) { }

  async showPrompt() {
    const prompt = await this.alertCtrl.create({
      header: 'Album',
      message: 'Enter a name for this new album',
      inputs: [
        {
          name: 'name1',
          type: 'text',
          placeholder: 'Placeholder 1'
        },
        {
          name: 'name2',
          type: 'text',
          placeholder: 'Placeholder 2'
        },
      ],
      buttons: [
        {
          text: 'Cancel',
          handler: data => {
            console.log('Cancel clicked');
          }
        },
        {
          text: 'Save',
          handler: data => {
            console.log('Saved clicked');
          }
        }
      ]
    });
    await prompt.present();
  }
}
Home.page.html
    Ionic Alert


    Prompt Alert
输出:

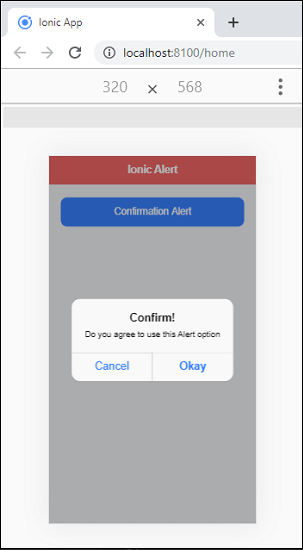
4.确认警报
这些类型的警报用于在继续应用程序之前确认特定选择。例如,当用户想要从通讯簿中删除或删除联系人时,这是必需的。
例
主页
import { Component } from '@angular/core';
import { AlertController } from '@ionic/angular';

@Component({
  selector: 'app-home',
  templateUrl: 'home.page.html',
  styleUrls: ['home.page.scss'],
})
export class HomePage {
  constructor(public alertCtrl: AlertController) { }
  async showConfirm() {
    const confirm = await this.alertCtrl.create({
      header: 'Confirm!',
      message: 'Do you agree to use this Alert option',
      buttons: [
        {
          text: 'Cancel',
          role: 'cancel',
          handler: () => {
            console.log('Confirm Cancel');
          }
        },
        {
          text: 'Okay',
          handler: () => {
            console.log('Confirm Okay.');
          }
        }
      ]
    });
    await confirm.present();
  }
}
Home.page.html
    Ionic Alert


    Confirmation Alert
输出:
5.无线电警报
无线电警报与确认警报类似,但是建议使用无线电组件代替此组件。这种类型的警报为用户提供了一组选项,其中只能选择一个选项。
例
主页
import { Component } from '@angular/core';
import { AlertController } from '@ionic/angular';

@Component({
  selector: 'app-home',
  templateUrl: 'home.page.html',
  styleUrls: ['home.page.scss'],
})
export class HomePage {
  constructor(public alertCtrl: AlertController) { }
  async showRadio() {
    const alert = await this.alertCtrl.create({
      inputs: [
        {
          name: 'radio 1',
          type: 'radio',
          label: 'Green',
          value: 'green',
          checked: true,
        },
        {
          name: 'radio 2',
          type: 'radio',
          label: 'Black',
          value: 'black',
        },
        {
          name: 'radio 3',
          type: 'radio',
          label: 'Red',
          value: 'red',
        },
      ],
      buttons: [
        {
          text: 'Cancel',
          handler: data => {
            console.log('Cancel clicked');
          }
        },
        {
          text: 'Save',
          handler: data => {
            console.log('Saved clicked');
          }
        }
      ]
    });
    await alert.present();
  }
}
Home.page.html
    Ionic Alert


    Radio Alert
输出:

6.复选框警报
复选框警报与确认警报相似,但是建议使用复选框组件代替它。这种类型的警报为用户提供了一组多项选择,用户可以在其中选择其选择的选项。
例
主页
import { Component } from '@angular/core';
import { AlertController } from '@ionic/angular';

@Component({
  selector: 'app-home',
  templateUrl: 'home.page.html',
  styleUrls: ['home.page.scss'],
})
export class HomePage {
  constructor(public alertCtrl: AlertController) { }
  async showCheckBoxAlert() {
    const alert = await this.alertCtrl.create({
      header: 'What is your favorite Programming Language?',
      inputs: [
        {
          name: 'checkbox 1',
          type: 'checkbox',
          label: 'Java',
          value: 'Java',
          checked: true,
        },
        {
          name: 'checkbox 2',
          type: 'checkbox',
          label: 'Android',
          value: 'Android',
        },
        {
          name: 'checkbox 3',
          type: 'checkbox',
          label: 'Python',
          value: 'Python',
        },
      ],
      buttons: [
        {
          text: 'Cancel',
          handler: data => {
            console.log('Cancel clicked');
          }
        },
        {
          text: 'Save',
          handler: data => {
            console.log('Saved clicked');
          }
        }
      ]
    });
    await alert.present();
  }
}
Home.page.html
    Ionic Alert


    CheckBox Alert
输出:
