📌 相关文章
- popover (1)
- popover - Javascript (1)
- popover - Javascript 代码示例
- popover - 任何代码示例
- Bootstrap Popover(1)
- popover bootstrap 3 (1)
- bootstrap popover (1)
- Bootstrap Popover
- ionic 4与ionic 3(1)
- ionic 4与ionic 3
- ionic 段(1)
- ionic (1)
- ionic 段
- .popover 不是函数 (1)
- popover bootstrap 3 - 任何代码示例
- bootstrap popover - 任何代码示例
- 离子-Javascript Popover
- 离子-Javascript Popover(1)
- .popover 不是函数 - 无论代码示例
- Bootstrap-Popover插件
- Bootstrap-Popover插件(1)
- 如何在 ReactJS 中使用 Popover 组件?
- 如何在 ReactJS 中使用 Popover 组件?(1)
- ionic 列表
- ionic 列表(1)
- ionic - 任何代码示例
- Ionic键和Ionic化合物(1)
- Ionic键和Ionic化合物
- ionic安装
📜 ionic Popover
📅 最后修改于: 2021-01-03 04:50:26 🧑 作者: Mango
ionic 弹夹
弹出窗口是出现在当前页面顶部的小覆盖层,用于显示其他信息。您可以将其用于任何用途,但通常用于导航栏中不适合的其他操作。它使我们能够非常轻松地呈现或收集来自用户的信息。通常在以下情况下使用。
- 它显示有关当前视图的其他信息。
- 您可以选择常用的工具和配置。
- 它提供了要在当前视图内执行的操作的列表。
弹出式控制器
它负责在Ionic应用程序中创建弹出框。它使用create()方法创建弹出框。您可以通过在create方法中设置弹出选项来自定义控制器。
Present()方法
present()方法用于在弹出实例上显示弹出通知。需要在present()方法中传递click事件以定位弹出窗口。如果您未通过事件,则弹出窗口将位于视图的中心。
让我们逐步了解如何将数据从页面传递到弹出框组件。
步骤1:创建一个新项目。您可以从此处了解如何在Ionic 4中创建项目。
步骤2:创建一个popover自定义组件。无需创建页面,因为创建组件的目的是仅列出新消息的通知。为此,请运行以下命令。
$ ionic g component notifications
步骤3:在创建通知组件之后,打开以下文件,并插入给定的代码。您可以根据需要更改代码。
notifications.component.scss
ion-list {
    &.list-ios {
        margin-bottom: 0;
    }
}
notifications.component.html
      Notifications


      New Offer 30% OFF


      New Offer 15% OFF by month!


      New Offer 45% OFF


      New Offer 25% OFF on Credit Card!


      New Offer 20% OFF by month!
步骤4:接下来,在创建通知组件之后,配置app.module.ts文件。在这里,您需要导入通知组件,然后将其添加到@NgModule中。
import { NgModule } from '@angular/core';
import { BrowserModule } from '@angular/platform-browser';
import { RouteReuseStrategy } from '@angular/router';

import { IonicModule, IonicRouteStrategy } from '@ionic/angular';
import { SplashScreen } from '@ionic-native/splash-screen/ngx';
import { StatusBar } from '@ionic-native/status-bar/ngx';

import { AppComponent } from './app.component';
import { AppRoutingModule } from './app-routing.module';
import { NotificationsComponent } from './notifications/notifications.component';

@NgModule({
  declarations: [AppComponent, NotificationsComponent],
  entryComponents: [NotificationsComponent],
  imports: [BrowserModule, IonicModule.forRoot(), AppRoutingModule],
  providers: [
    StatusBar,
    SplashScreen,
    { provide: RouteReuseStrategy, useClass: IonicRouteStrategy }
  ],
  bootstrap: [AppComponent]
})
export class AppModule {}
步骤5:打开home.page.ts文件并添加以下代码。在此文件中,我们可以将数据从主页传递到弹出框组件。
import { Component } from '@angular/core';
import { PopoverController } from '@ionic/angular';
import { NotificationsComponent } from '../notifications/notifications.component';

@Component({
  selector: 'app-home',
  templateUrl: 'home.page.html',
  styleUrls: ['home.page.scss'],
})
export class HomePage {
  constructor(public popoverCtrl: PopoverController) { }
  async notifications(ev: any) {
    const popover = await this.popoverCtrl.create({
        component: NotificationsComponent,
        event: ev,
        animated: true,
        showBackdrop: true
    });
    return await popover.present();
  }
}
第6步:打开home.page.html文件并添加以下代码。
Ionic Popover
Popover Notification
2
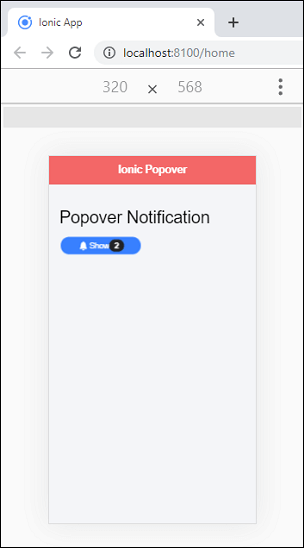
步骤7:现在,运行应用程序,您将获得以下屏幕。

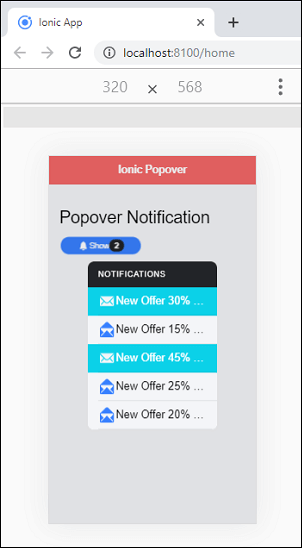
在上面的屏幕中,单击“显示通知”按钮,浏览器中将显示以下屏幕。在这里,您可以看到弹出通知。
