PoseNet 姿势估计
姿势估计是指计算机视觉技术,它检测图像和视频中的人或物体,以便人们可以确定例如某人的肘部在图像中出现的位置。姿态估计技术 有 许多应用程序,例如手势控制、动作识别以及增强现实领域。在本文中,我们将讨论 PoseNet,它使用卷积神经网络 (CNN) 模型从单个 RGB 图像回归姿势。它也可以用于提供5ms/帧速度的实时系统。
深度学习回归模型:
我们训练的卷积神经网络 (ConvNet) 的目标是直接从单目图像I估计相机姿势。网络输出姿势向量p,由 3-D 相机位置x和由四元数q表示的方向给出:
其中姿势p是相对于任意全局参考系定义的。我们选择四元数作为我们的方向表示,因为任意 4-D 值可以通过将它们归一化为单位长度来轻松映射到合法旋转。我们的回归器的损失函数可以定义为:

其中 beta 是选择的比例因子,以保持位置和方向误差的预期值大致相等。室内场景在120-750之间,室外场景在250-2000之间
建筑学:
作者使用 GoogLeNet 架构来开发姿势回归网络。原始的 GoogLenet 架构包含 22 层,其中包含6 个 Inception 模块和两个额外的分类器。作者对架构进行了一些更改,这些更改是:
- 用仿射回归器替换三个 softmax 分类器中的每一个。取出 softmax 层并修改每个全连接层以产生 7 维表示位置和方向的姿势向量。
- 在特征大小为 2048 的最终回归器之前添加另一个完全连接的层。这是为了形成一个定位特征向量,然后可以对其进行泛化。
- 在测试时,我们还将四元数方向向量归一化为单位长度。
执行:
- 在此代码中,我们将使用由 TensorFlow 创建和训练的 PoseNet 模型。这些模型适用于各种设备,例如它们可以在浏览器或 Android 或 iOS 设备上运行。在Python运行它们。我们将使用这个实现。
Python3
# Necessary imports
%tensorflow_version 1.x
!pip3 install scipy pyyaml ipykernel opencv-python==3.4.5.20

# Clone some Code from GitHub
!git clone https://www.github.com/rwightman/posenet-python

import os
import cv2
import time
import argparse
import posenet
import tensorflow as tf
import matplotlib.pyplot as plt

print('Initializing')
input_file = '/content/posenet-python/video.avi'
output_file = '/content/posenet-python/output.mp4'

# Load input video files and
cap = cv2.VideoCapture(input_file)
width = int(cap.get(cv2.CAP_PROP_FRAME_WIDTH))
height = int(cap.get(cv2.CAP_PROP_FRAME_HEIGHT))
fps = cap.get(cv2.CAP_PROP_FPS)
# create a video writer to write the output file
fourcc = cv2.VideoWriter_fourcc('M','J','P','G')
video = cv2.VideoWriter(output_file, fourcc, fps, (width, height))

model = 101
###scale_factor = 1.0
scale_factor = 0.4

with tf.Session() as sess:
      # Load PoseNet model
    model_cfg, model_outputs = posenet.load_model(model, sess)
    output_stride = model_cfg['output_stride']
    start = time.time()

    incnt = 0
    # Process the whole video frame by frame
    while True:
        # Increase frame count by one
        incnt = incnt + 1
        try:
          # read_cap is utility function to read and process from video
          input_image, draw_image, output_scale = posenet.read_cap(
                cap, scale_factor=scale_factor, output_stride=output_stride)
        except:
          break
        # run the model on the image and generate output results
        heatmaps_result, offsets_result, displacement_fwd_result, displacement_bwd_result = sess.run(
            model_outputs,
            feed_dict={'image:0': input_image}
        )
        # here we filter poses generated by above model
        # and output pose score, keypoint scores and their keypoint coordinates
        # this function will return maximum 10 pose, it can be changed by maximum_pose
        # variable.
        pose_scores, keypoint_scores, keypoint_coords = posenet.decode_multiple_poses(
            heatmaps_result.squeeze(axis=0),
            offsets_result.squeeze(axis=0),
            displacement_fwd_result.squeeze(axis=0),
            displacement_bwd_result.squeeze(axis=0),
            output_stride=output_stride,
            min_pose_score=0.25)
        # scale keypoint co-ordinate to output scale
        keypoint_coords *= output_scale
        # draw pose on input frame to obtain output frame
        draw_image = posenet.draw_skel_and_kp(
                draw_image, pose_scores, keypoint_scores, keypoint_coords,
                min_pose_score=0.25, min_part_score=0.25)
        video.write(draw_image)
# release the videoreader and writer
video.release()
cap.release()- 这将生成一个视频输出文件。我们已经在来自 OpenPose GitHub 存储库的此视频上测试了模型。我无法在此处上传,因为它超出了大小限制。您可以在此处查看生成的视频。
使用的数据集:
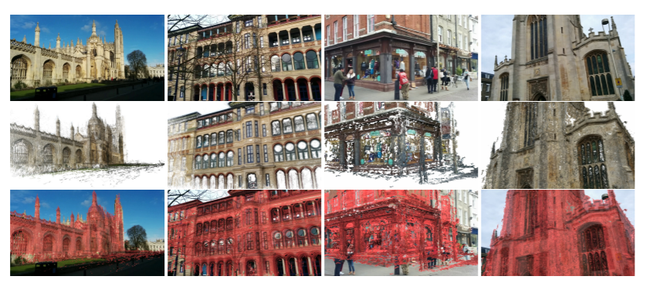
该数据集是使用运动结构 (SfM) 技术生成的,作者将其用作本文的地面实况测量。行人使用谷歌 LG Nexus 5 智能手机在每个场景周围拍摄高清视频。以下是该数据集的一些结果。

重新定位结果,视觉重建的预测相机姿态(中间),再次以红色叠加显示在原始图像上
参考:
- PoseNet 纸